LiveChat updates
We like to stay fresh!

Introducing Product Cards and Dashboard for BigCommerce
We just shipped two new features for our BigCommerce integration, that make using LiveChat easier both for Agents and Admins.
Product Cards
Now, all agents can send product cards right from the LiveChat app. It’s very easy; you search for a product, select it and hit send. Each card contains an image, a description, and a link to the product page.
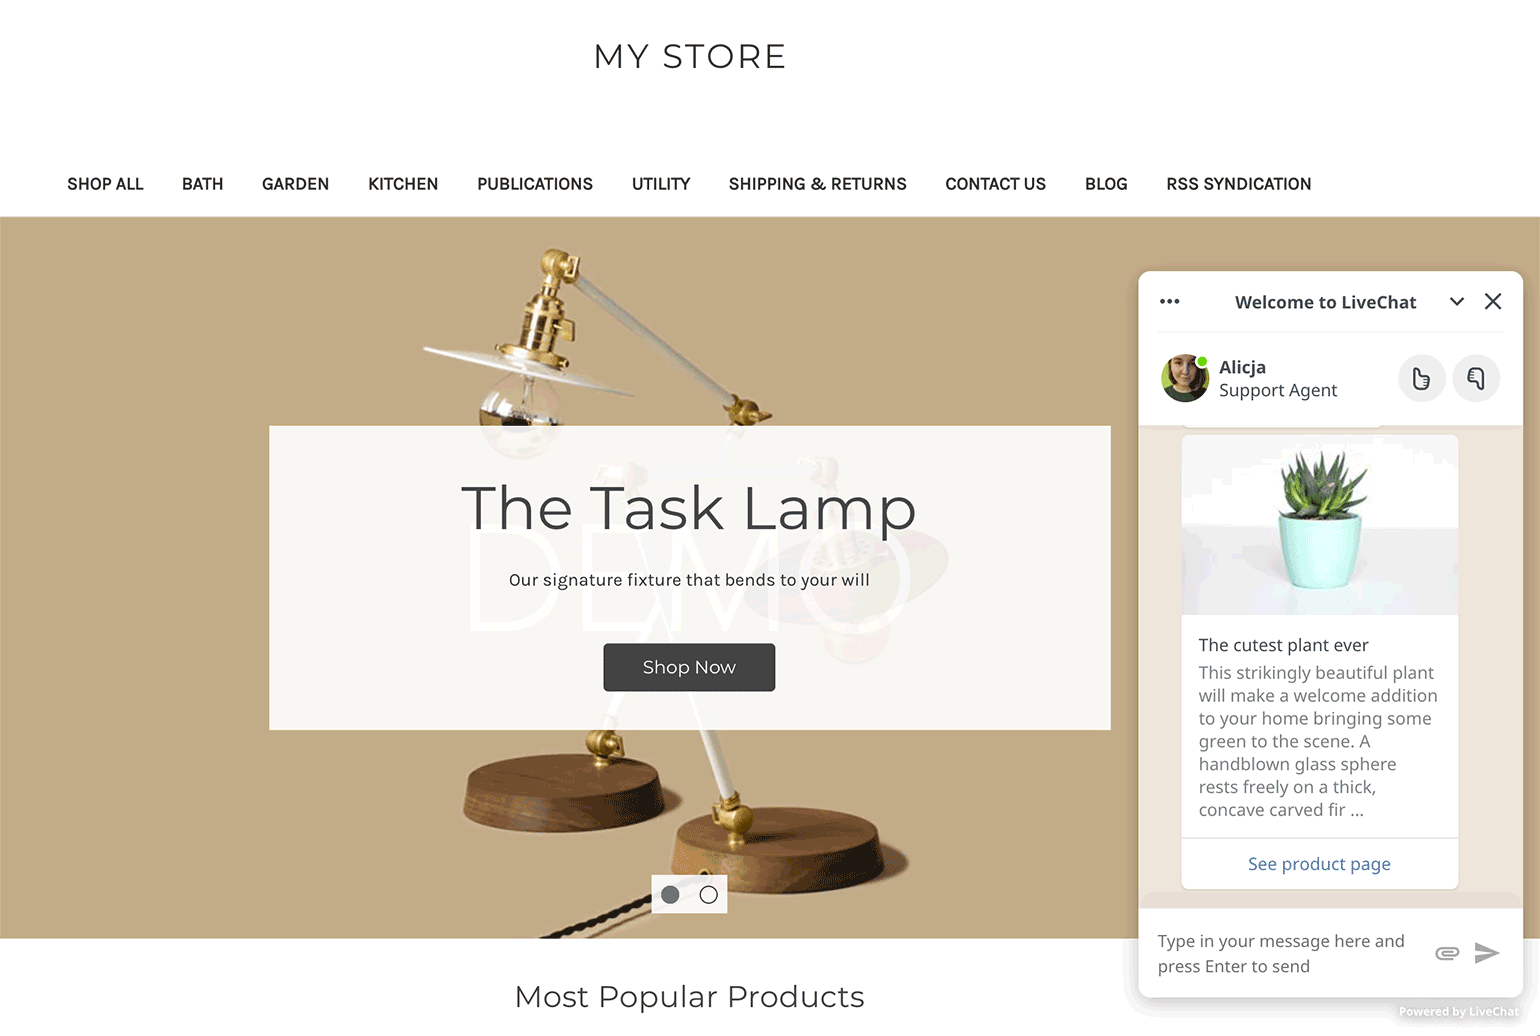
Have more than one store? Not a problem. You can easily switch between products from each one of your connected stores.
All that without leaving the LiveChat app. No more jumping between chats and product pages in your store.
LiveChat Dashboard
You are an admin and take care of how LiveChat performs on your website?
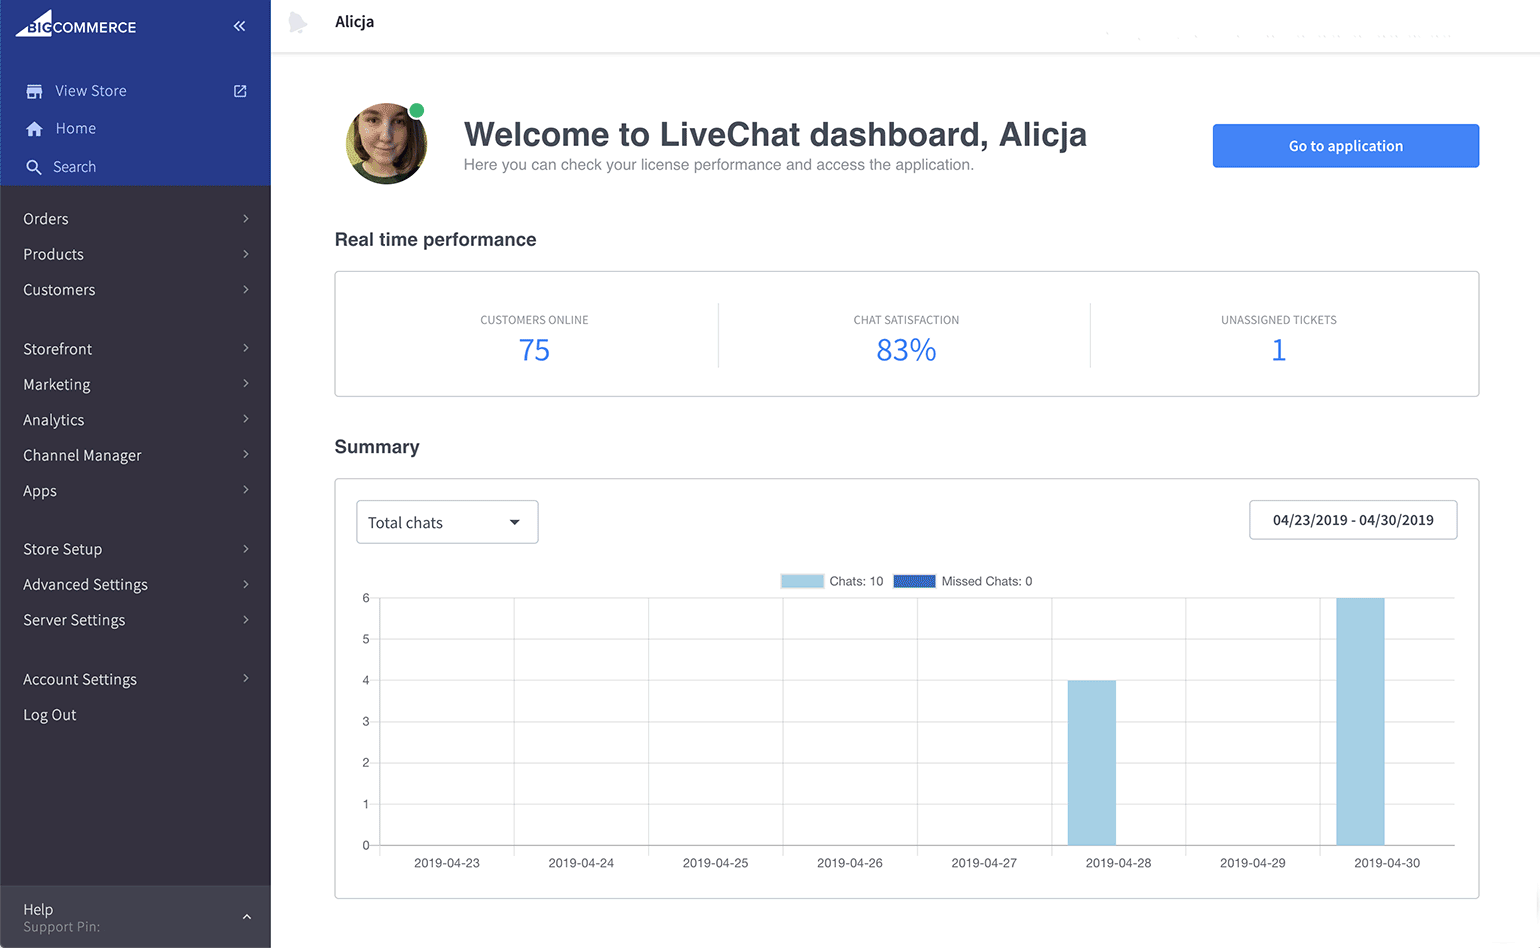
With Dashboard, you have access to data on greetings conversion, customers browsing your site, the number of unassigned tickets and many more. Right in the BigCommerce app.
Learn more
Learn more about Product Cards and Dashboard from our Knowledge Base.

Tickets section got a new look
Another part of our app was redesigned. This time, we are happy to introduce the Tickets section with a fresh, new look.
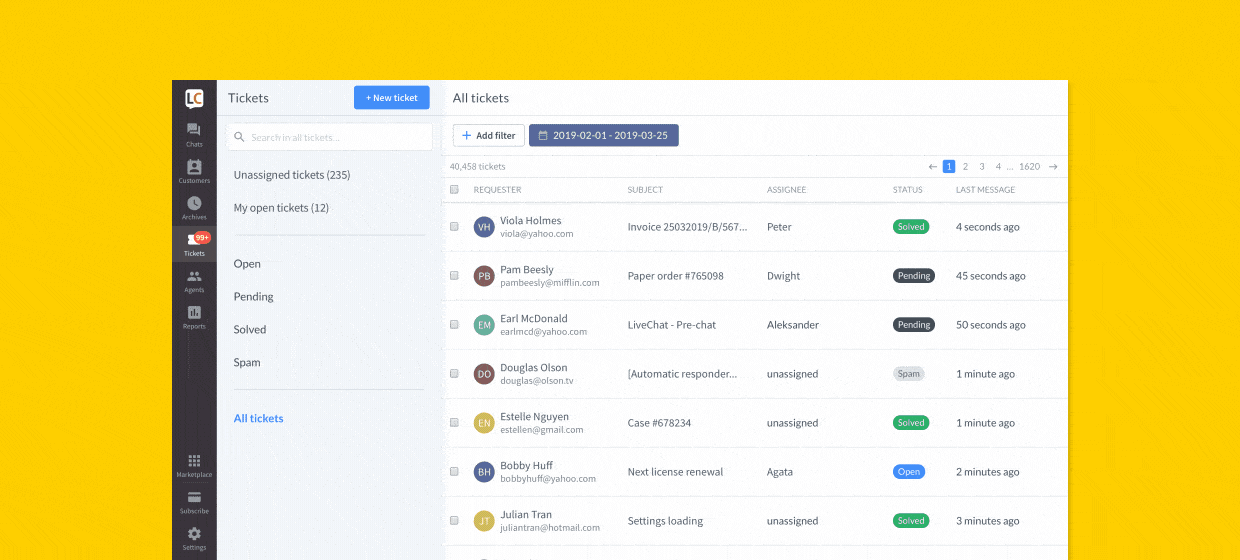
Now, you can quickly manage your tickets thanks to clear layout, intuitive filters, and neatly organized details. We’ve also added an All tickets tab so you can find a ticket even if you don’t know its status.
Learn more about what has changed from our post on LiveChat Developers Blog.
Customize your Customer Details
From now on, you can decide what information (and in what order) is visible in Customer Details. All that, so you can have all the data about your customers close at hand.
What’s even better, you can add these apps: UPS Delivery Status and Hubspot as widgets in Customer Details. Which means no more switching between tabs and more time to provide excellent customer support.
Learn more about Customer Details.
Brand new Archives are here!
We’re constantly working on the Agent app so it has more powerful features but stays easy to use. Today, we shipped redesigned Archives.

What has changed?
- The new design is easier to work with. Clear division between a list of archived chats, chat feed and details, makes you know what is what immediately.
- You can see all chats with a particular customer with one click.
- The old filters like Agents, Groups, Tags, Sales, etc. are still there. Now, you can set them to return results that meet one or more conditions. For example, all chats that were tagged with either Support or Sales tags.
- Last but not least, it is possible to sort chats by date.
Click here to learn more about Archives, and don’t forget to share your feedback on our official LiveChat Community forum!
Our Zendesk integration supports custom fields!
I want to let you know that our Zendesk integration has been updated! From now on, when you’re creating a ticket in Zendesk, LiveChat will load custom fields from your Zendesk account. You can populate them with additional information about your customers, gathered straight from the chat!

But that’s not all! You can also choose a field to which LiveChat will automatically attach ID of the chat, from which the ticket was created. Just in case that you’d like to keep record of which chats resulted in creating tickets.
Learn more
Click here to learn how to integrate LiveChat with Zendesk and how to get started with all those new features!
LiveChat Supports Rich Messages
I am very happy to announce that from now on, LiveChat supports rich messages. What does it mean exactly? That you can mix and match: text, images, and buttons to create personalized product cards and clickable menus. Send them right on chat to provide better support and boost sales.

We are only getting started, and for now, you can create rich messages through our integration with ChatBot. All messages sent by bots are displayed both in the chat widget and the Agent App.
Learn more
Read this article to learn more about the benefits and capabilities of our newest feature.
Even easier chat window customization
About two months ago we shipped our new, robust chat widget configurator. But we’ve never stopped working on it. Today, I want to show you what has changed since the big premiere, and what new options are available.
What has changed
First, thanks to a collapsible menu, you can quickly find the setting you are looking for.

Second, now you can change not only the widget’s position (left/right) but also its side and bottom spacing.

Third, you can choose different visibility options for your chat widget – head to our article on Chat widget visibility to learn more.

What is more, visibility, chat widget position and widget type can be set separately for mobile devices.

Last but not least, Preview shows not only the widget’s appearance but also its alignment on your website.

Curious about these features? Go to Settings → Chat window → Customization and try them out.
Talk to us
Did you like what we did with the Chat widget configurator? We always welcome your feedback. And don’t forget our Support Heroes are there for you 24/7/365.
Join LiveChat Community!
Fancy talking with 25k companies that use LiveChat? We’ve got it covered! From now on, you can join our discussion platform and chat away.
Meet other agents, experts, developers, and the LiveChat team themselves! It is a perfect place to exchange information about LiveChat features, customer service tips&tricks and making the most of chatting with customers.
How to join?
Community is open to all LiveChat users. You can find it either in the Help Section in the Agent app. Or in the main menu on the LiveChat website.

Once you get there, use your LiveChat credentials to sign in. And that’s it! Now all you need to do is write your first post!
See you there!
Tweak Your Chat with Our New Chat Widget Configurator!
Our new Chat Configurator is here, giving you the option to change the looks of your chat window and tweak its behaviour without using any additional CSS or JavaScript configuration.

How to enable the New Chat Configurator?
If you’re not yet using the new Chat Configurator, the process of turning it on is quite simple! Head over to the Customization section of your LiveChat settings and click on the Discover new look button.

You should see a new Chat Widget Configurator, together with the preview of your brand new chat widget. To apply changes, click on the Save changes button.

And that’s it! Now you can start using your new Chat Widget Configurator to change the looks of your chat!
So, what options are there?
Pick your theme
Our new Chat Configurator gives you the option to pick a theme of your chat window. You can currently choose between Smooth and Modern, but don’t worry! There are more themes coming really soon.

In addition to changing the theme of your chat, you can also change the style of your minimized chat widget. Amaze your customers with a simple yet functional Bar or a modern and minimalistic Bubble!

Pick your color
With the Pick your color option, you can choose a color scheme similar to that of your company’s brand. Picking a carefully pre-selected set of colors will increase your visitors’ website immersion, providing a much greater browsing experience.

We also realize that each website is different. That is why, in addition to the ready sets of colors, we’re giving you a feature called Custom Colors. A tool allowing you to adjust the color of your chat perfectly.

From now on, you can change the color of your minimized and maximized widget elements, either by providing a hexadecimal representation of a color or by using our built-in color palette!

Widget position
With widget position, you can decide on which side of your website your customers should expect to interact with the chat window. Either on the left or, as set-up by default, on the right! And all of that without any additional CSS customization.

Oh, and did we mentioned that it works great on mobile devices as well? But don’t take our words for it: try for yourself, with just a click of a button!
OK, but what about the widget’s behaviour?
With the new Chat Widget configurator, we want to bring you the possibility to change the behaviour of your chat window, without modifying LiveChat script added to the source code of your website.

So, which behaviour can you modify exactly?
Show agent’s photo
Decide whether you’d like to display your agent’s photo during a chat and in the chat bubble, after your customer will minimize the chat window or receive a greeting.
Enable sound notifications for customers
By default, your customers will be notified about a new greeting and a new message received in a chat by a sound notification. This should get their attention whenever they, for example, minimized their browser while talking with your agents. However, if you’d like to disable those sound notifications, simply switch this option off.
Let customers rate agents
With this option, you can decide whether your customers can rate your agents during or after the chat.
Let customers get chat transcripts
Turn on this option to give your customers the possibility to request the transcript of their current chat. The chat transcript will be sent to their email.
Hide widget until it gets activated
If you’d like to keep your chat widget hidden until your customer will either: receive a greeting or interact with a custom start chat button added to your website (more on this subject here), this option is the way to go. Oh, and it’ll also work in case that you’d like to implement our open chat window API method, to build your custom mechanism responsible for opening a chat.
Display widget on mobile
Enabled by default, this option will make sure that your customer can chat with you when browsing through your store on their phones or tablets. If you wouldn’t like that however, simply switch this option off.
Tell me more!
If you’d like to know more about the new Chat Widget Configurator, don’t hesitate to start a chat with us! Our Support Heroes are available 24/7/365 and are always ready to help.
Send SMS to Your Customers with Twilio for LiveChat!
With Twilio for LiveChat, you can start sending SMS to your customers right during a chat! And all of that without leaving your LiveChat application.

Twilio for LiveChat: what does it offer?
There are three core features offered by Twilio integration:
- Sending SMS to customers during and/or after the chat;
- Scanning your pre-chat survey for the phone number and automatically adding it to the Send to field;
- Loading the history of previous messages from Twilio, based on the phone number provided by you or your customer.
All of them can be accessed easily during or after a chat, right at the top right section of your Chats or Archives sections.

OK, show me how it works!
To make your life easier, we’ve prepared a dedicated tutorial that will show you how to integrate your LiveChat with Twilio and how to use the integration itself. Click here to check it out!
Also, in case of any additional questions, don’t hesitate to start a chat with us! Our Support Heroes are available 24/7/365 and are always ready to help!