Connect Mailchimp with LiveChat to harness the lead-generating power of live chat. Let your customers subscribe to your campaigns and newsletters while they fill out the pre-chat form, automatically add customers to Mailchimp Audiences from chat and view their Mailchimp profiles in the LiveChat Agent app.
This integration lets you:
add new contacts to your Mailchimp audience during chats
use data from chat interactions for targeted campaigns
display automated chat invitations with the option to subscribe
send a subscription form in chat
create LiveChat tickets from newsletter replies
create customer journeys based on chat events
Tickets mentioned in this article refer to the old LiveChat ticketing system available to new customers until June 1, 2023. No worries, you can achieve the same using the HelpDesk.com forwarding options and teams feature.
Tickets mentioned in this article refer to the old LiveChat ticketing system available to new customers until June 1, 2023. No worries, you can achieve the same using the HelpDesk.com forwarding options and teams feature.
Log in to your Mailchimp account or create a new one.
4
Select Allow to connect LiveChat with Mailchimp.
5
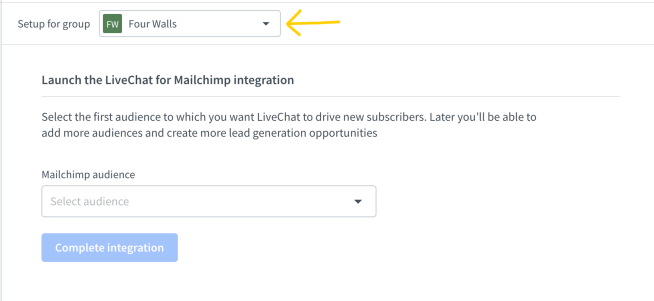
Next, from the drop-down menu select the group to which you want to assign a Mailchimp audience. This option is only available when you have more than one group set up in LiveChat.
6
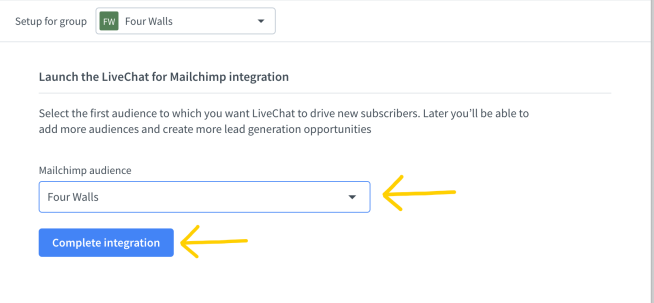
From the dropdown menu select the first audience you want to connect with LiveChat. You will be able to add more audiences and update the preferred one later. Then select Complete integration.
If you have two websites with two separate email lists, you can use the Groups feature in LiveChat to link each page to a separate audience.
If you have two websites with two separate email lists, you can use the Groups feature in LiveChat to link each page to a separate audience.
The Mailchimp integration is now installed. The subscription form for the Mailchimp audience you selected has been added to the pre-chat form for the LiveChat Group you selected. You can edit your audiences as well as the pre-chat form. For step-by-step instructions, see the next section: Settings.
Settings
In this section we go through editing your settings:
Adding and deleting audiences
Updating connected audiences
Pre-chat form configuration
Email channel configuration
To adjust LiveChat settings for Mailchimp, go to Apps>App Settings>Mailchimp.
Add or delete audiences
LiveChat needs to be connected to at least one Mailchimp audience for the integration to work. You can add more audiences in the integration settings, you can also delete audiences.
Add more audiences
Once Mailchimp and LiveChat are connected, you can add as many audiences as you like to each group on your license. All you need to do is:
To delete audiences simply click on the bin icon next to the audience you wish to delete.
Make sure you are not deleting the audience connected to your subscription form in the pre-chat form. To learn how to edit the audiences connected to the pre-chat form, see the section below.
LiveChat requires at least one Mailchimp audience to be connected for the integration to work. If you delete an audience linked with the pre-chat form, make sure to select a different audience in its place.
Update connected audience in pre-chat form
To edit the audience in the subscription form of the pre-chat form:
Select the Pre-chat survey tile to open the options.
3
From the drop-down menu, select which audience should be included in the pre-chat survey.
4
Select Save.
Now your customers will be able to subscribe to the audience you selected when they fill out the pre-chat form.
Customize your pre-chat form
The beauty of the Mailchimp integration is that your customers can subscribe to your newsletters and campaigns while they fill out the pre-chat form before they start a chat. The opt-in to subscribe is automatically added to your pre-chat form when you connect Mailchimp with LiveChat. You can edit it in Settings>Forms>Pre-chat form.
From the drop-down menu select the group for which you want to edit the pre-chat form (this option is available when you have more than one group set up on your license).
2
You can edit the welcome message as well as the opt-in message. The changes will be visible in the preview on the right.
3
Optionally, mark the email field as required to make sure all customers provide their email address.
4
To finalize, select Save changes.
Repeat for other groups you have connected with Mailchimp.
Send sign-up form in chat
Send your newsletters sign-up forms directly in chat or display them automatically with campaigns. Customize them to fit your brand’s style and visibly grow your audience.
You can connect multiple audiences to allow visitors to subscribe to multiple newsletters on a single form.
You can connect multiple audiences to allow visitors to subscribe to multiple newsletters on a single form.
Choose under what names you want your audiences to be displayed on the form.
Expand Customize form content to proceed.
Customize Email label, Email placeholder, Button, and Confirmation text.
Select Save to complete the setup.
Your agents can now send the sign-up form in chat. All they have to do is select the Mailchimp icon in the details column, and select Send signup form.
Moreover, customers can select the Subscribe button on the chat widget, from their perspective, expanding the form any time they need.
And you can use it in automated campaigns! Read the next chapter to learn how to set it up.
Use automatic subscription invites
The signup form can also be displayed as a campaign, an automatic invitation to sign up. Mailchimp integration grants you access to the dedicated campaign template for that purpose.
In order to set up the signup campaign:
1
Navigate to the Apps>App Settings> Mailchimp.
2
Add audience to your signup form. If you already have an audience assigned, you can proceed.
3
Select Create campaign.
4
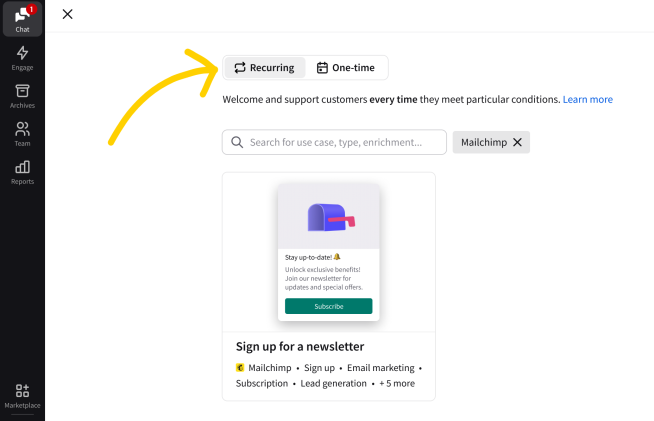
Select either a Recurring or a One-time section.
5
Select Sign up for a newsletter campaign.
6
Edit the campaign. Change picture and texts to fit your website style. See this tutorial to learn more about editing campaigns.
7
Select Next: set conditions to proceed.
8
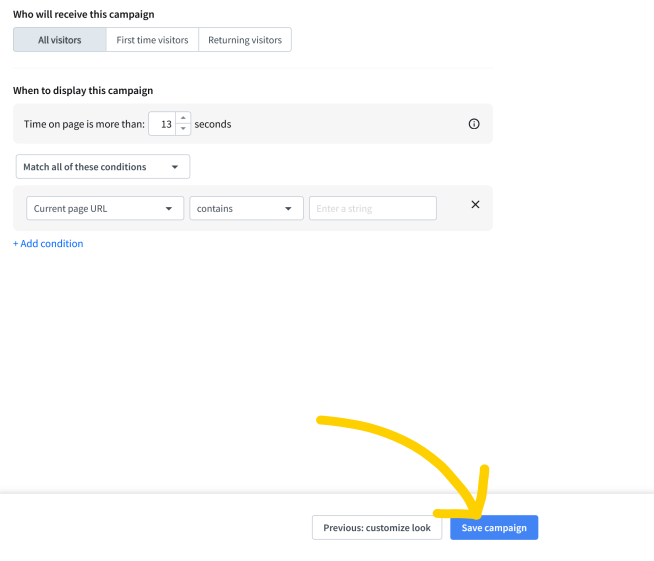
Select conditions which should apply to display the subscription invitation to a visitor. You can find more about the conditions here.
9
Save to finalize the setup.
Make sure to have an audience assigned before creating the signup campaign. Otherwise, it won’t work properly, and will only confuse your visitors.
You can use the templates to A/B test your invitations to subscribe: experiment with different colors of the action button, different images, or different conditions. See which version converts best.
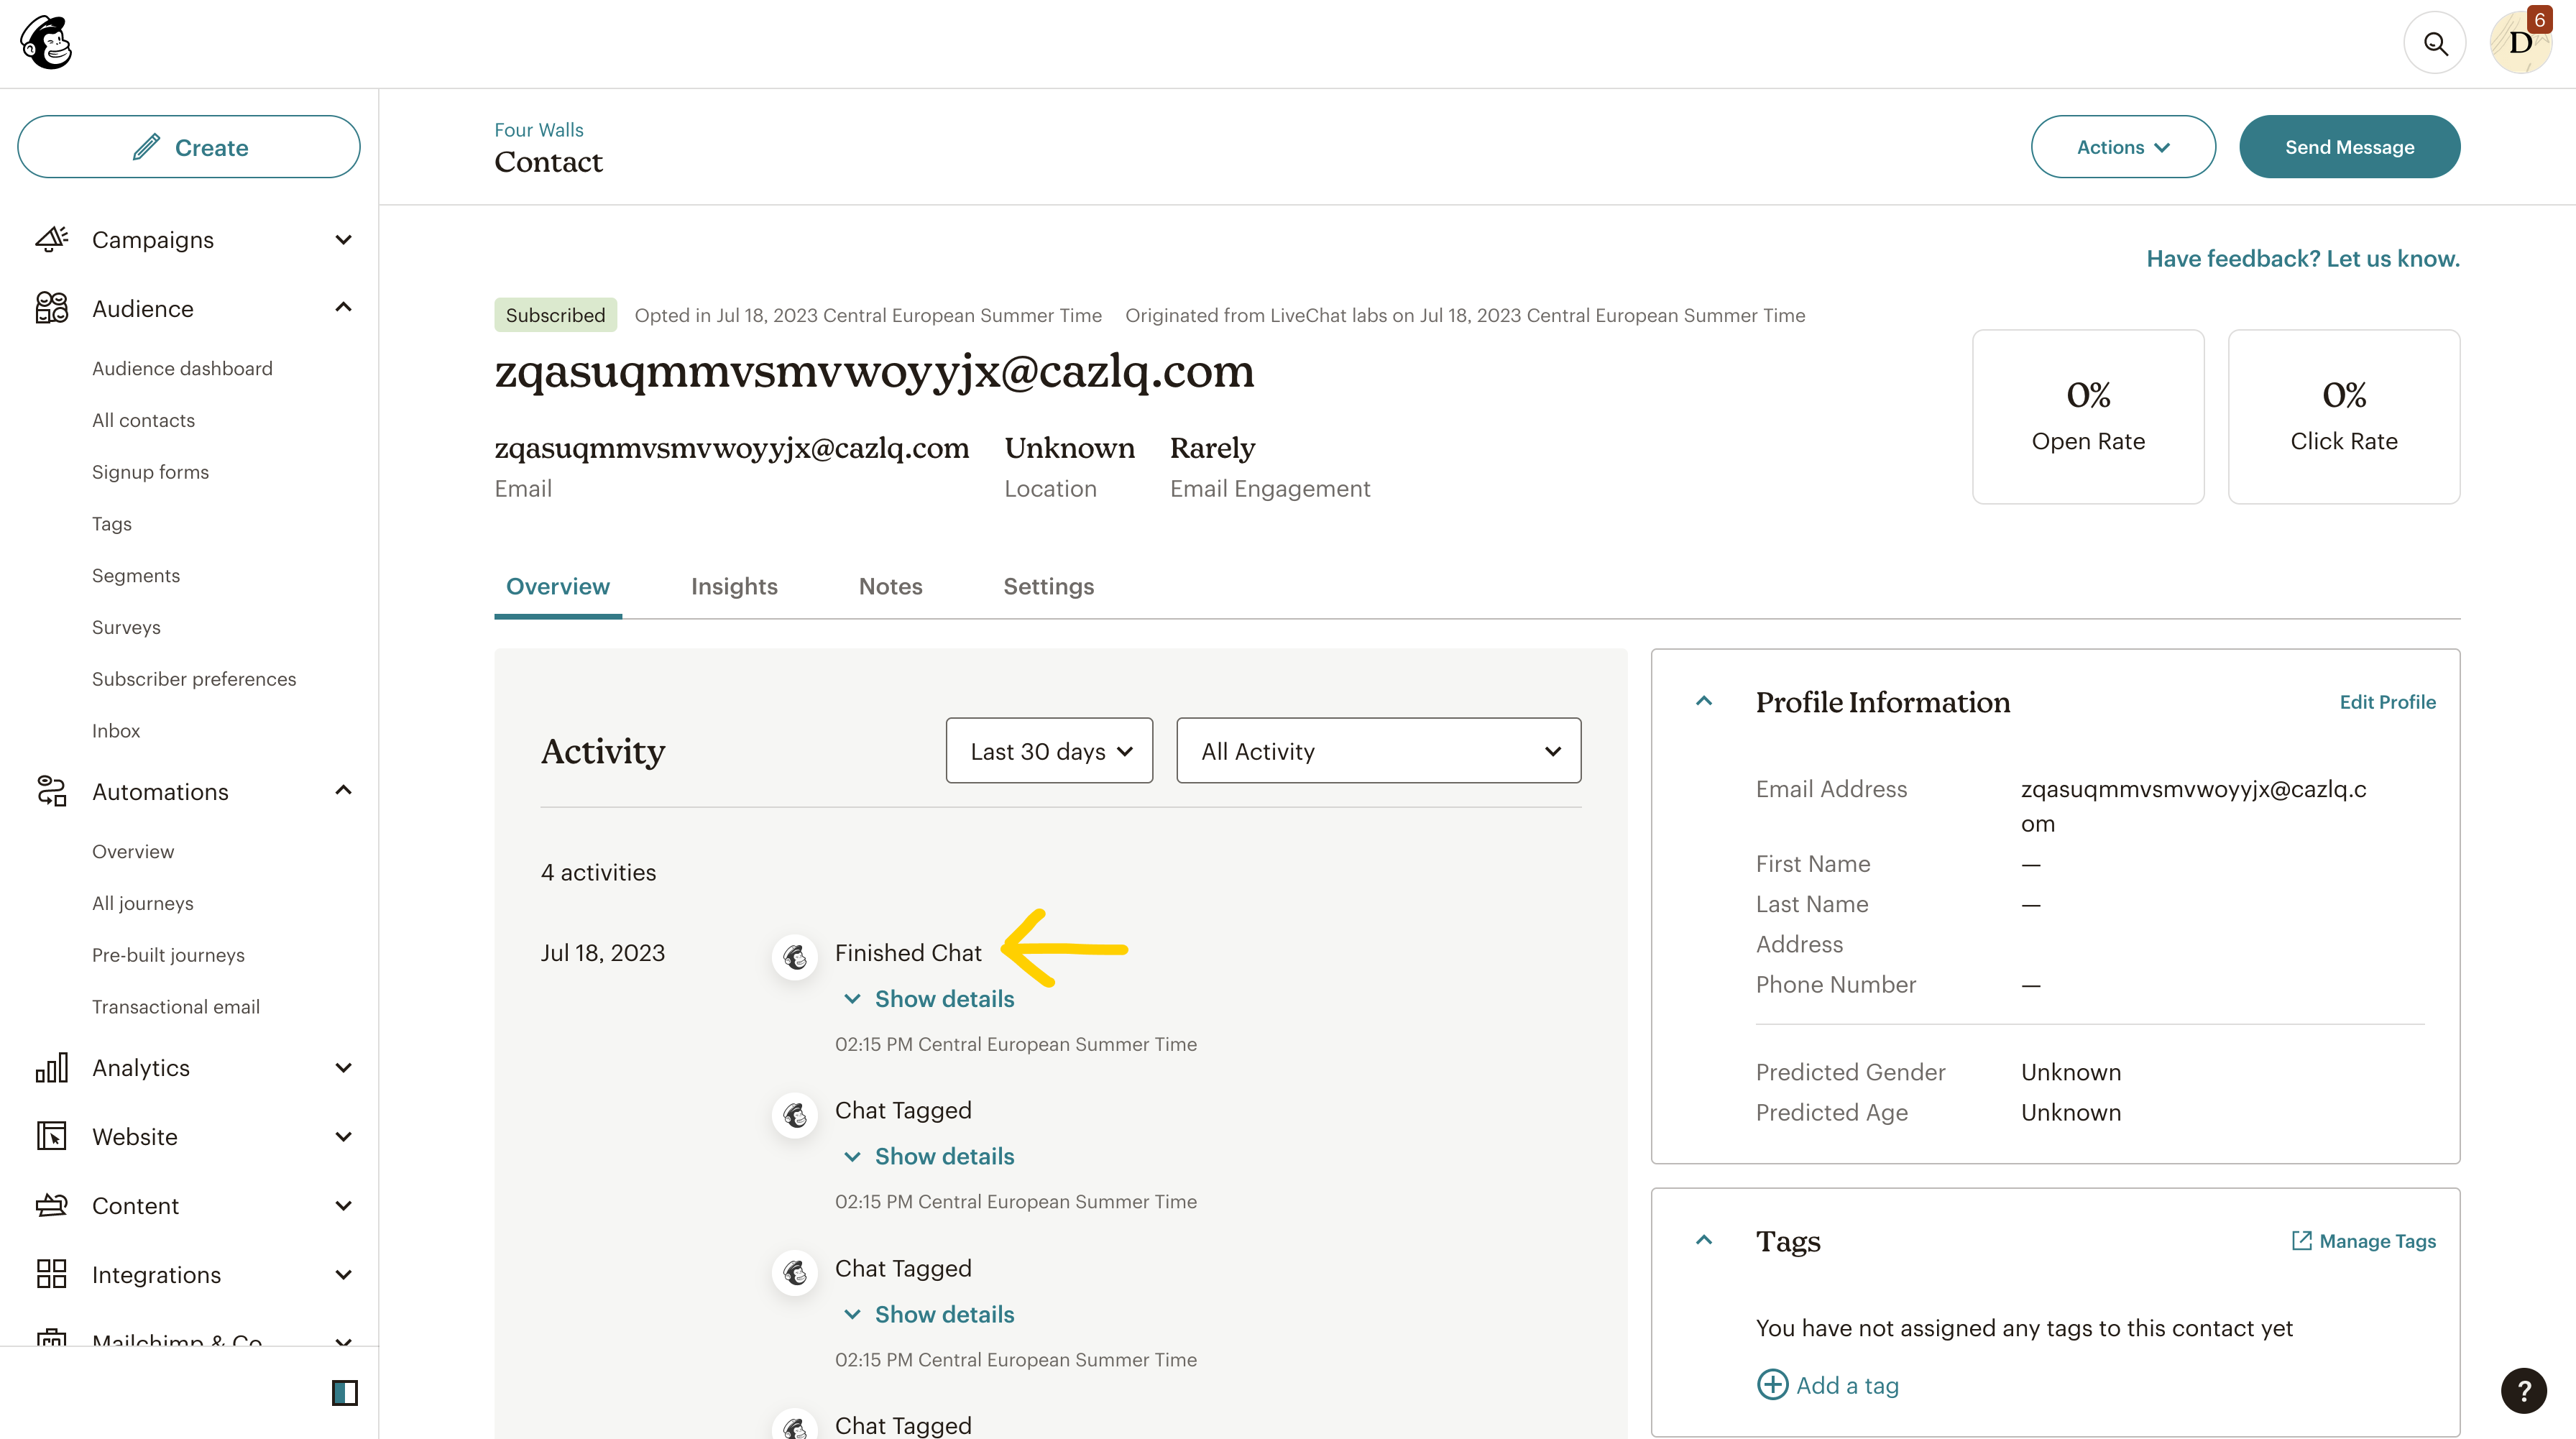
While the customer is chatting with you, you’ll be able to see the Mailchimp audiences they are subscribed to in the LiveChat Agent app. Select the tile to see more details, such as the audiences this contact is subscribed to as well as their Mailchimp rating.
If they unsubscribed from any of your newsletters or campaigns, you can see which ones and the reason they unsubscribed, if they provided it. You can also go to their profile in Mailchimp from here.
Filter contacts by data from LiveChat
Enhance subscriber profile information for marketers using Mailchimp as a marketing CRM.
Once customers subscribe to your newsletters or campaigns, they’ll be added to your Mailchimp Audiences. When you view an Audience in Mailchimp, you’ll be able to see which customers have subscribed via LiveChat. This will allow you to:
Monitor LiveChat conversion
Create dedicated campaigns for customers who subscribed via LiveChat
When you view individual contacts, you’ll be able to see LiveChat events assigned to particular customers - “Finished chat” and “ChatTagged”. Use these events to build event-triggered automations!
Build event-triggered automations
The integration with LiveChat enables you to create behavior-based automations in Mailchimp. This means that the moment your chat with the customer ends, or gets tagged, their journey with you can begin!
To enable event-triggered automation, go to Apps>App Settings>Mailchimp and switch the toggle.
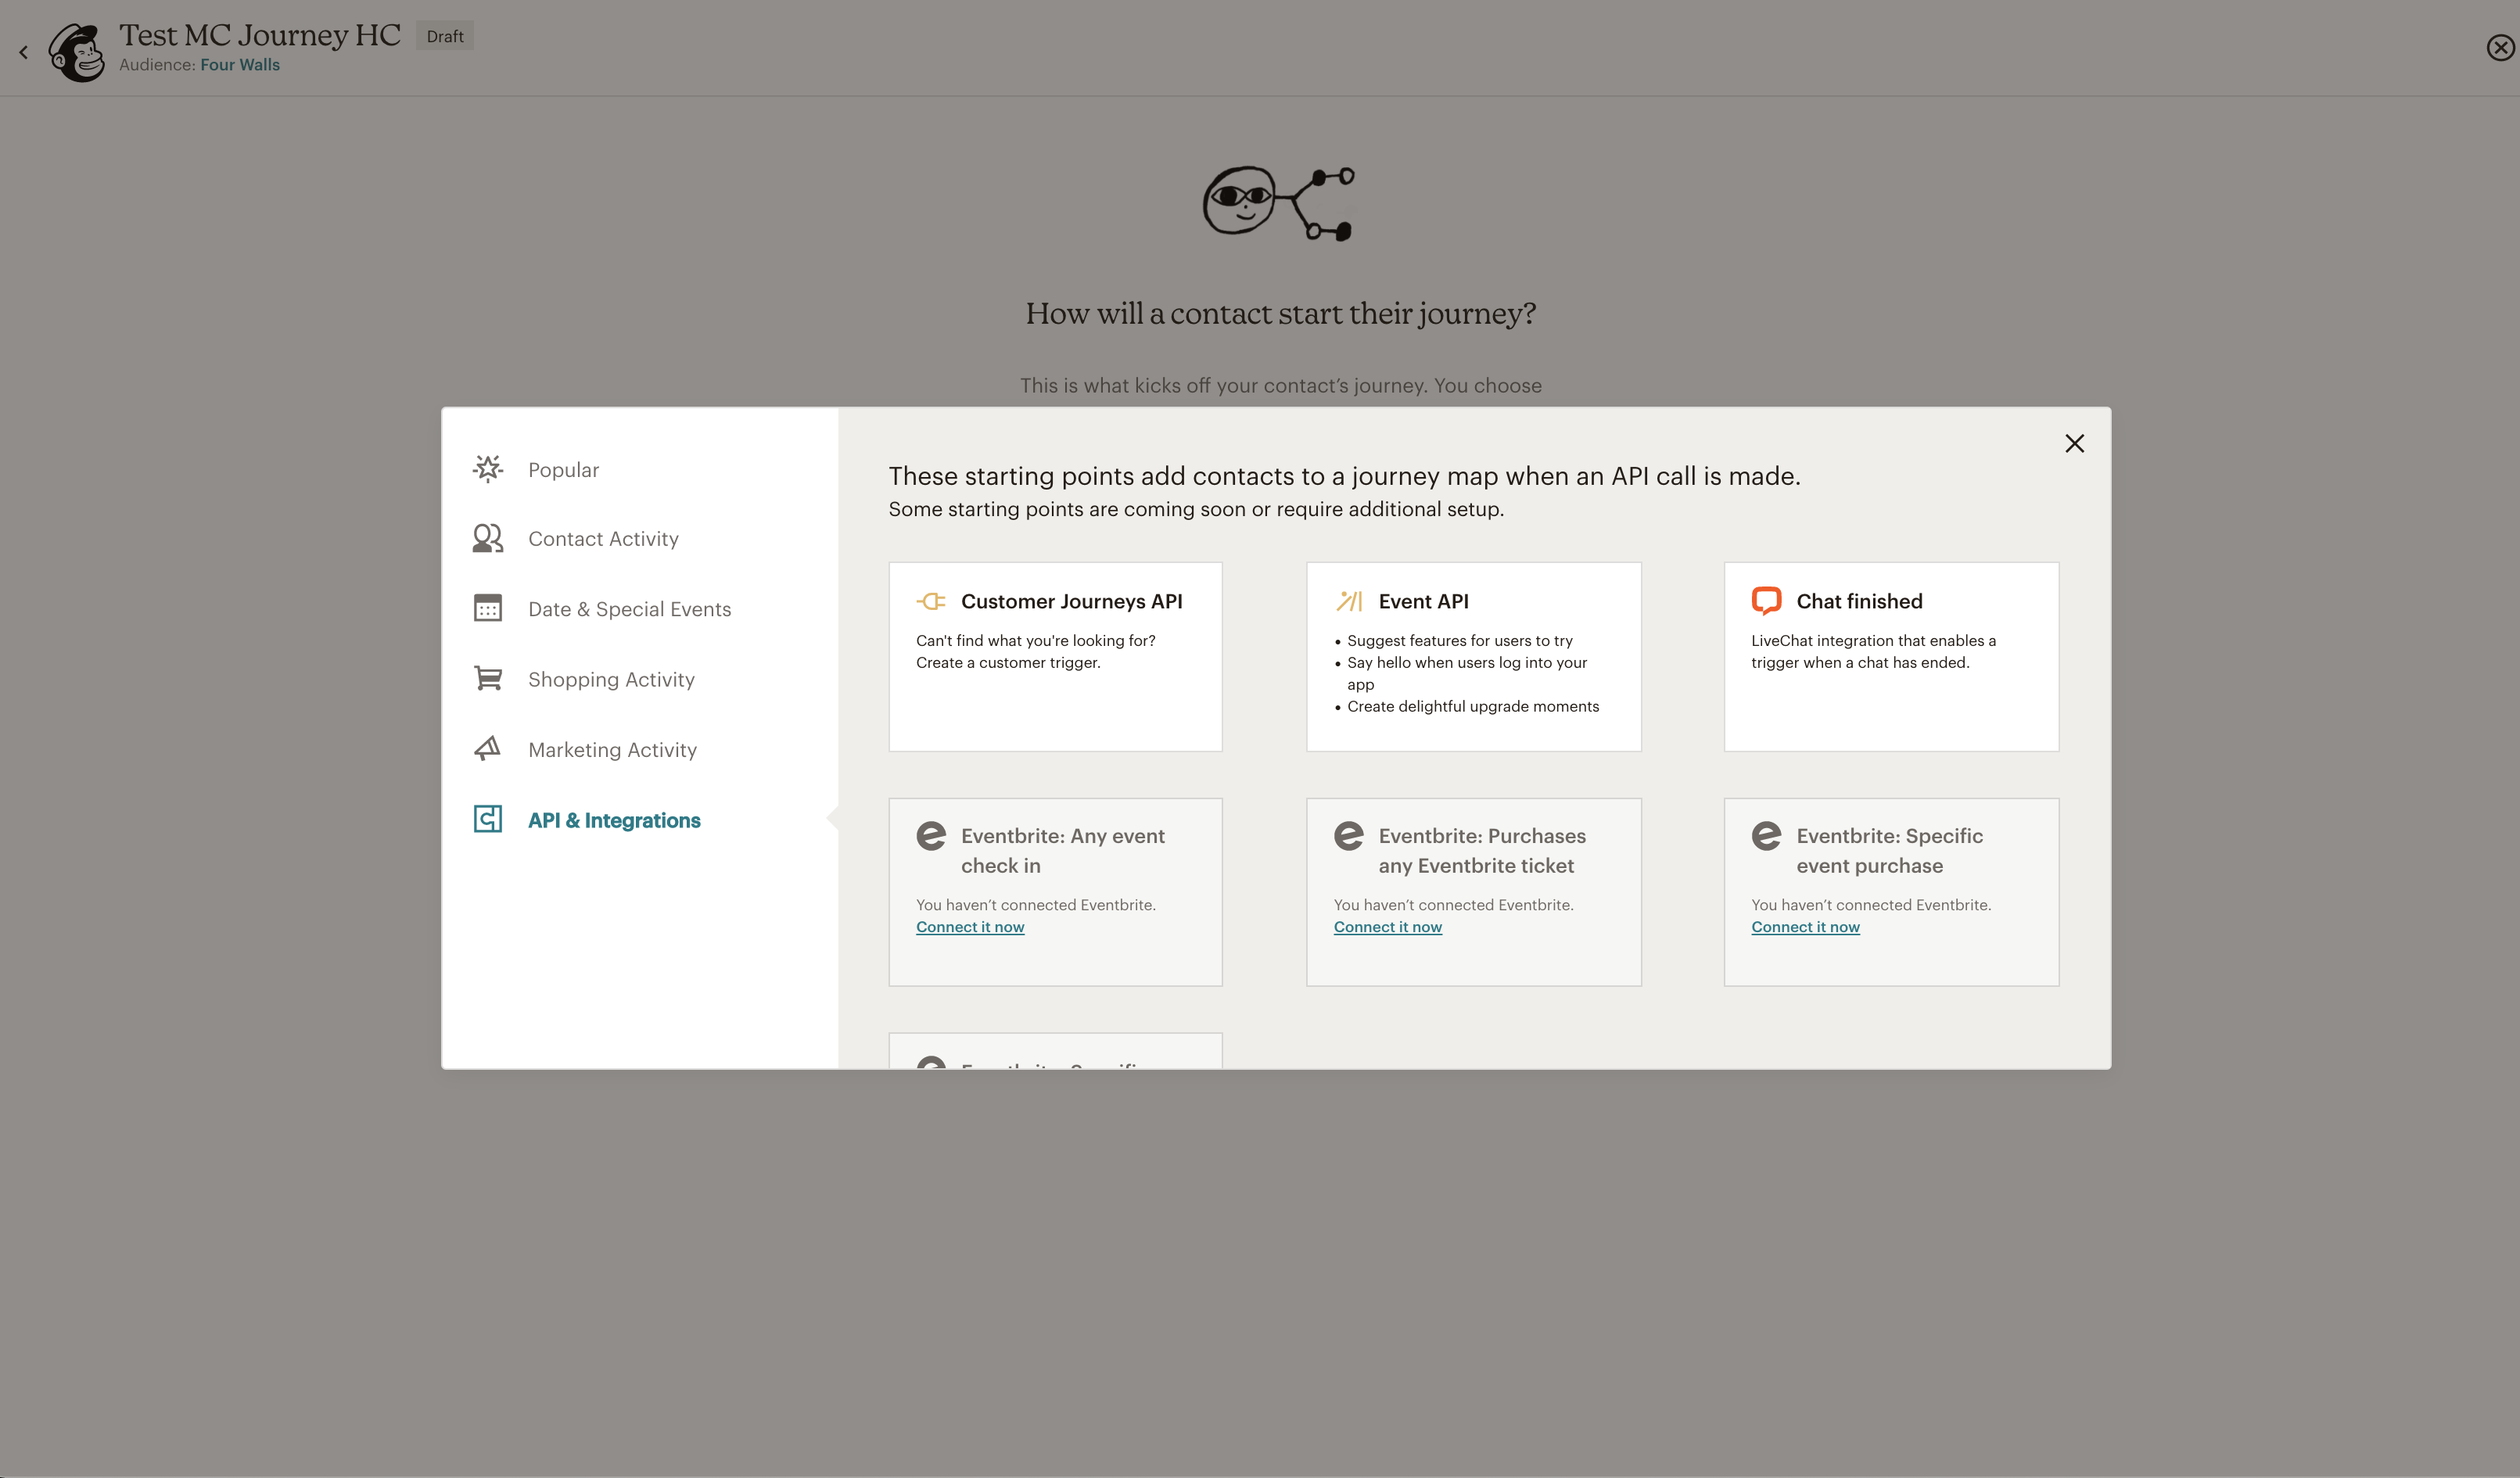
The Customer Journey Builder in Mailchimp has a pre-built LiveChat trigger. When you set this trigger in a customer journey, the customer is added to the journey once their chat ends or gets tagged. This way you can follow up with customers who came to chat with your team, send them a survey or a special offer.
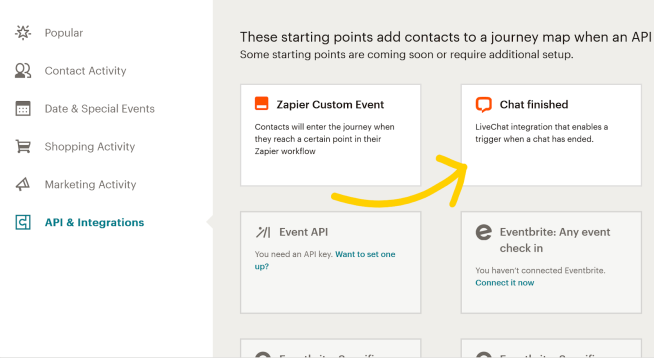
Building automations based on LiveChat data is very straightforward. All you need to do is go to your Mailchimp account>Automations>Customer Journey Builder, choose Start from scratch, then New starting point>Integration and API, and choose the LiveChat event there. Mailchimp will present you with an option to use “Chat finished” and “Chat tagged” as a starting point for your customer journeys.
Setup steps for chat finished event
1
First stop - your Mailchimp account. Log in using your credentials.
2
Select Automations from the left-hand column.
3
Select Build from scratch.
4
Fill in the name of your new automation. We recommend the name LiveChat to separate this journey from any other you may run. Select Start Building to proceed.
5
Select Choose A Starting Point.
6
Proceed to API & Integrations.
7
Select Chat finished.
8
Select Save Starting Point.
From here on out, your finished LiveChat chats will automatically trigger this email journey. Now let’s see how we can trigger emails once chats get tagged.
Setup steps for chat tagged event
The setup steps for the chat tagged event are very similar to chat finished event steps. You can follow the same steps up until step five and then continue with the instructions below:
1
Instead of selecting Chat finished starting point, select Event API.