The benefits of Salesforce integration:
- Create Leads and Contacts from chats and chat archives
- Search Salesforce Leads and Contacts directly in LiveChat
- Update Leads and Contacts directly in LiveChat
- Pass chat transcripts either as Cases or any other Object that you have created in your Salesforce account
How to set up?
Setting up the integration is easy - all you need are your Salesforce credentials. After adding the integration you will unlock exciting new possibilities in the field of lead generation.
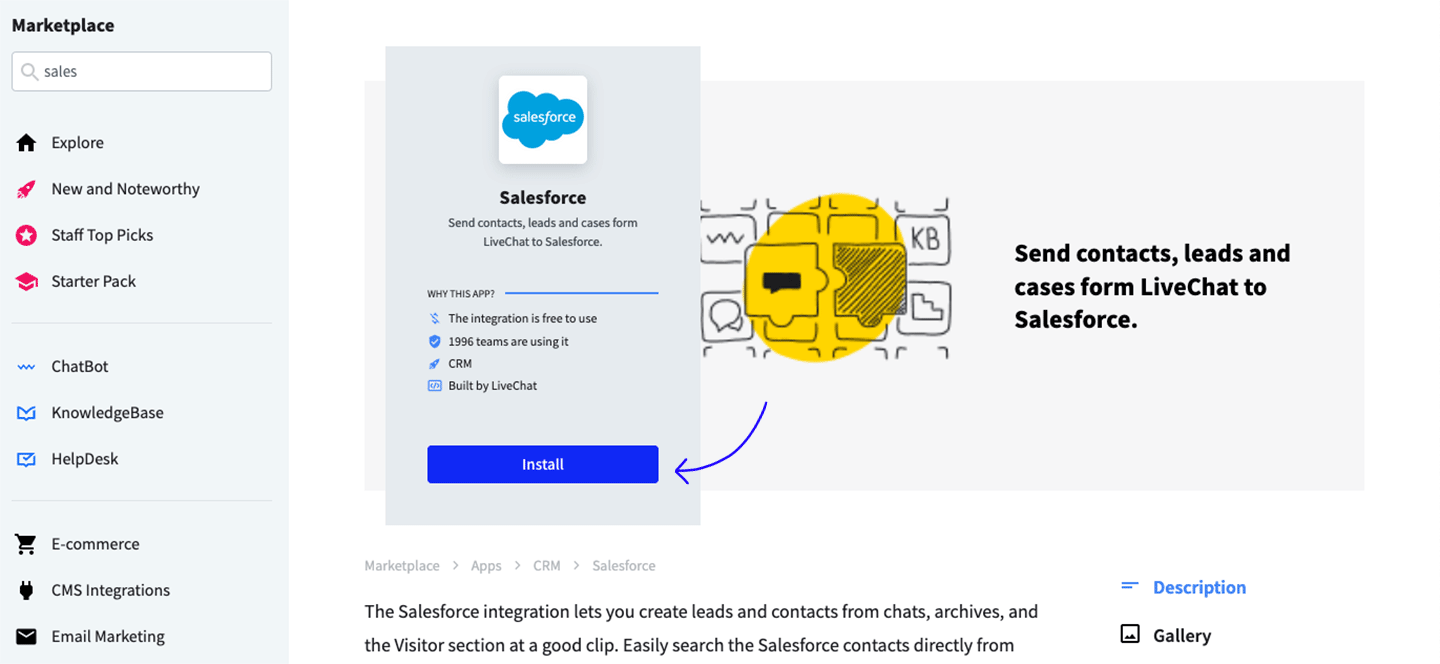
- Login to your LiveChat admin account and go to the Salesforce page in Marketplace. Then, add the integration by clicking on the Settings button.
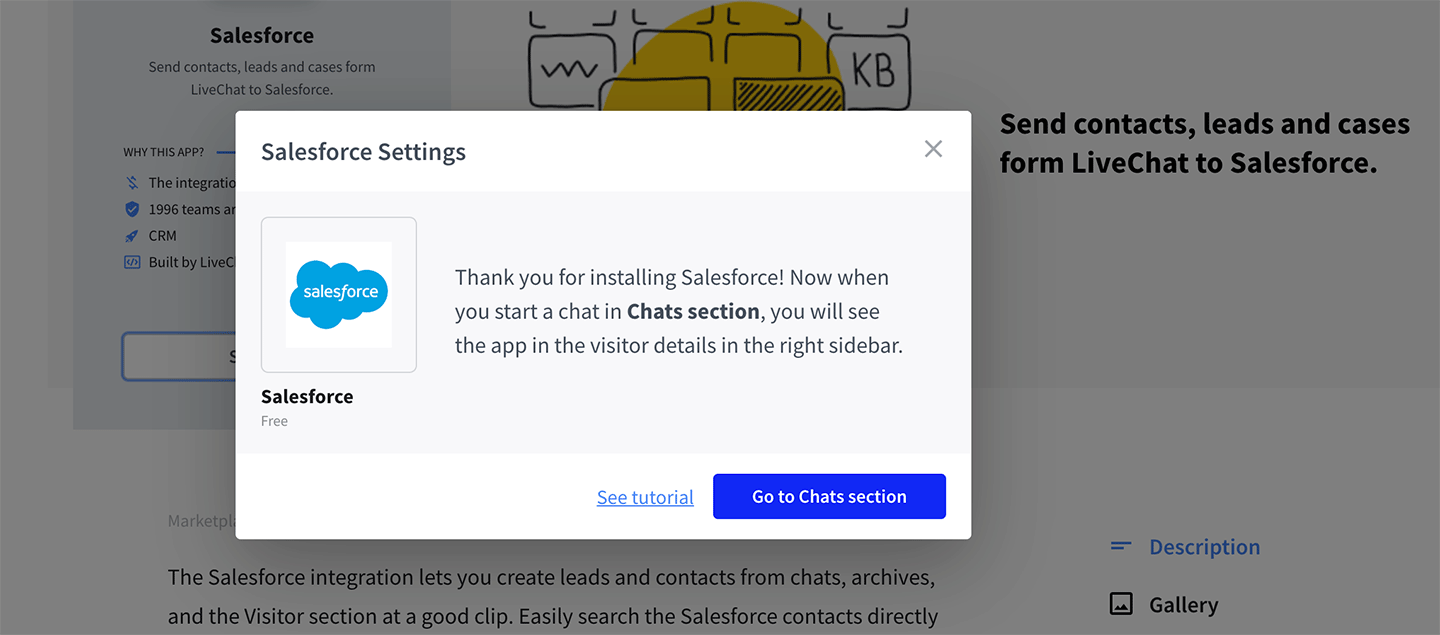
You will get a confirmation that the integration has been successfully added.
- Go to Chats or Archives, click on the Salesforce button on the top of the Details panel on the right-hand side. Press Connect, this will connect your Salesforce account with LiveChat.
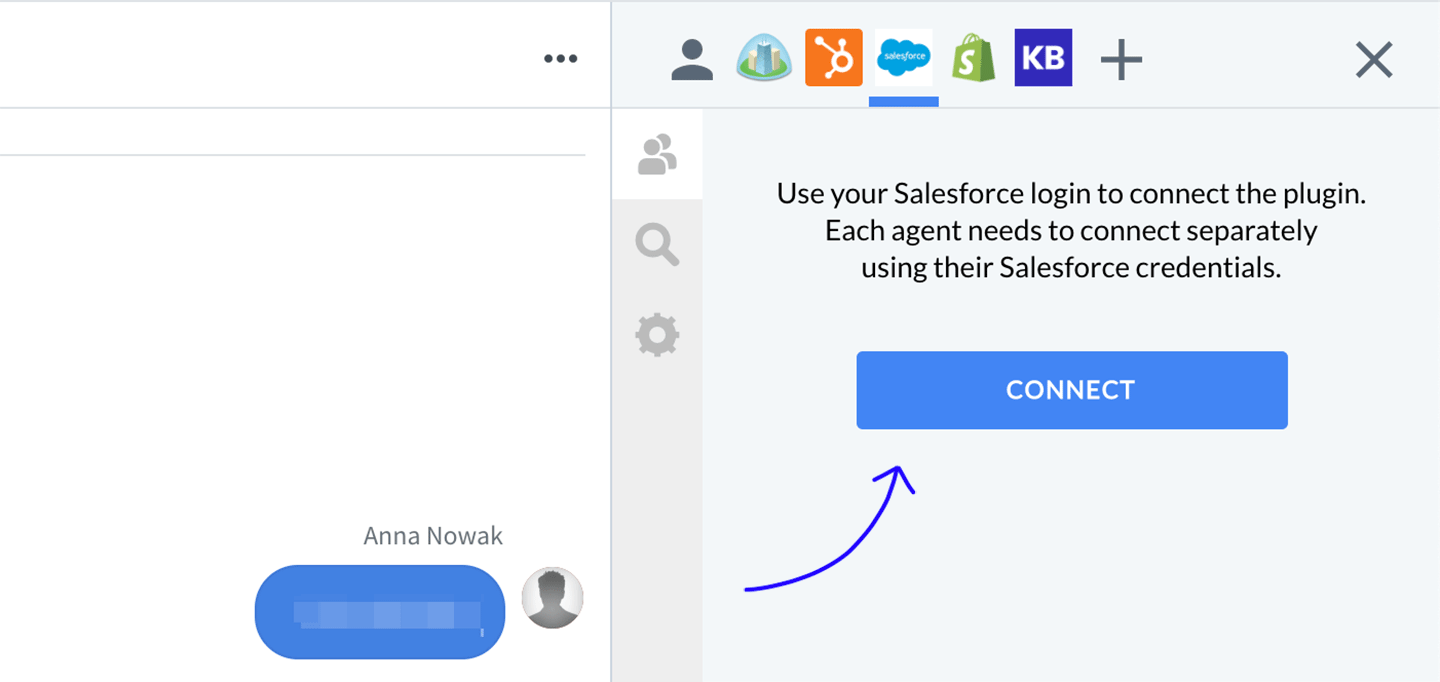
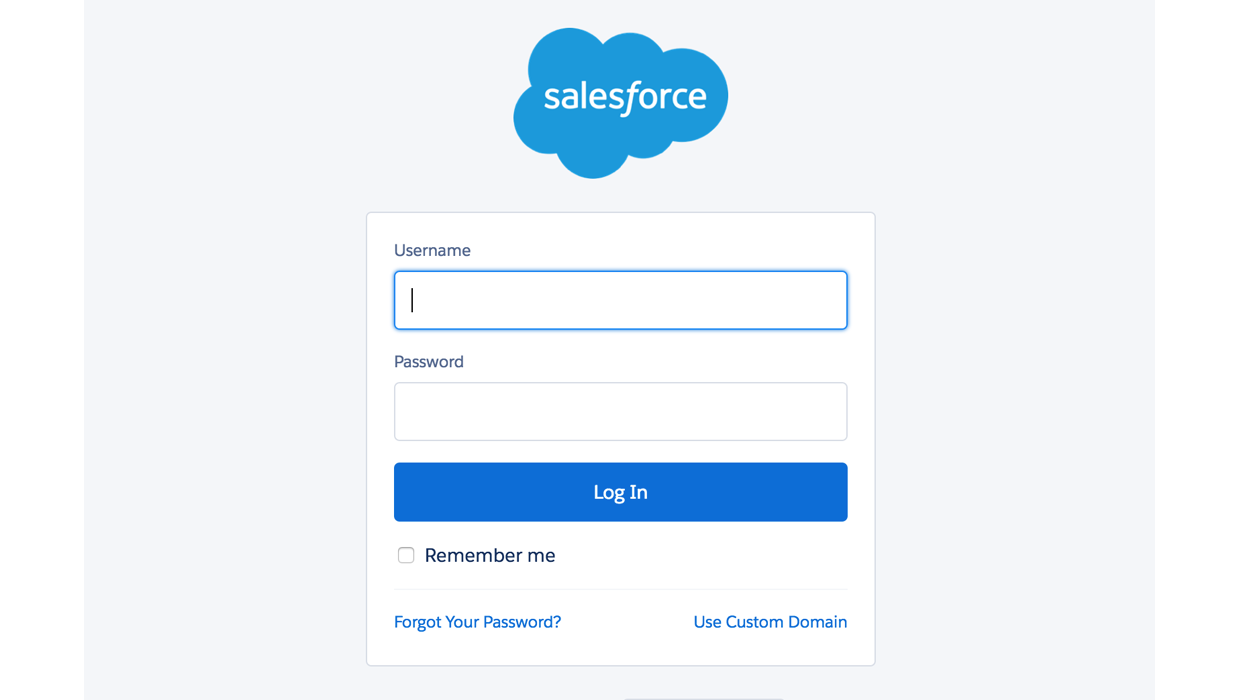
- Provide your Salesforce Username and Password and click on Log In button.
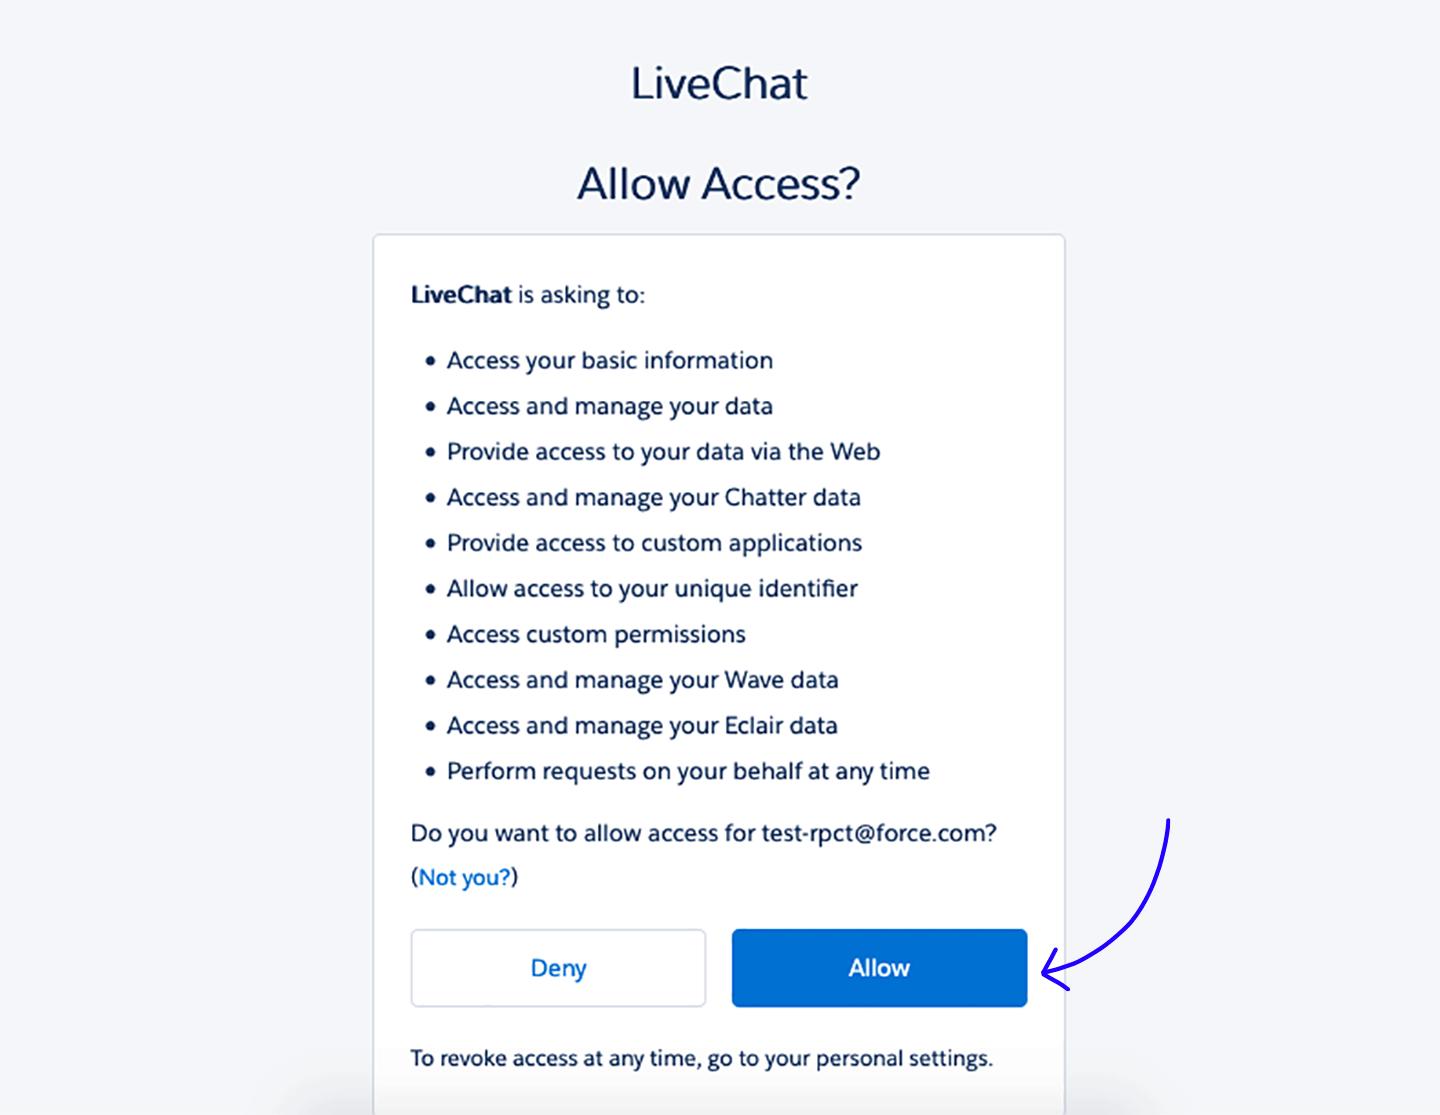
- On the next screen, the integration will ask you to grant LiveChat access to your Salesforce account - click on Allow in order to continue.
Done! Now your Salesforce is integrated with LiveChat and you can start using it right away!
How to configure?
You can adjust the Salesforce configuration to your needs, whether you want to see only specific information or pass transcripts to a custom Object in your Salesforce. The configuration is easy and here are the ways in which you can configure your Salesforce integration:
- Set up Lead and Contact fields visibility;
- Configure Chat transcripts option;
- Configure Salesforce Permission Set;
- Disable your integration.
How to configure Lead and Contact fields visibility?
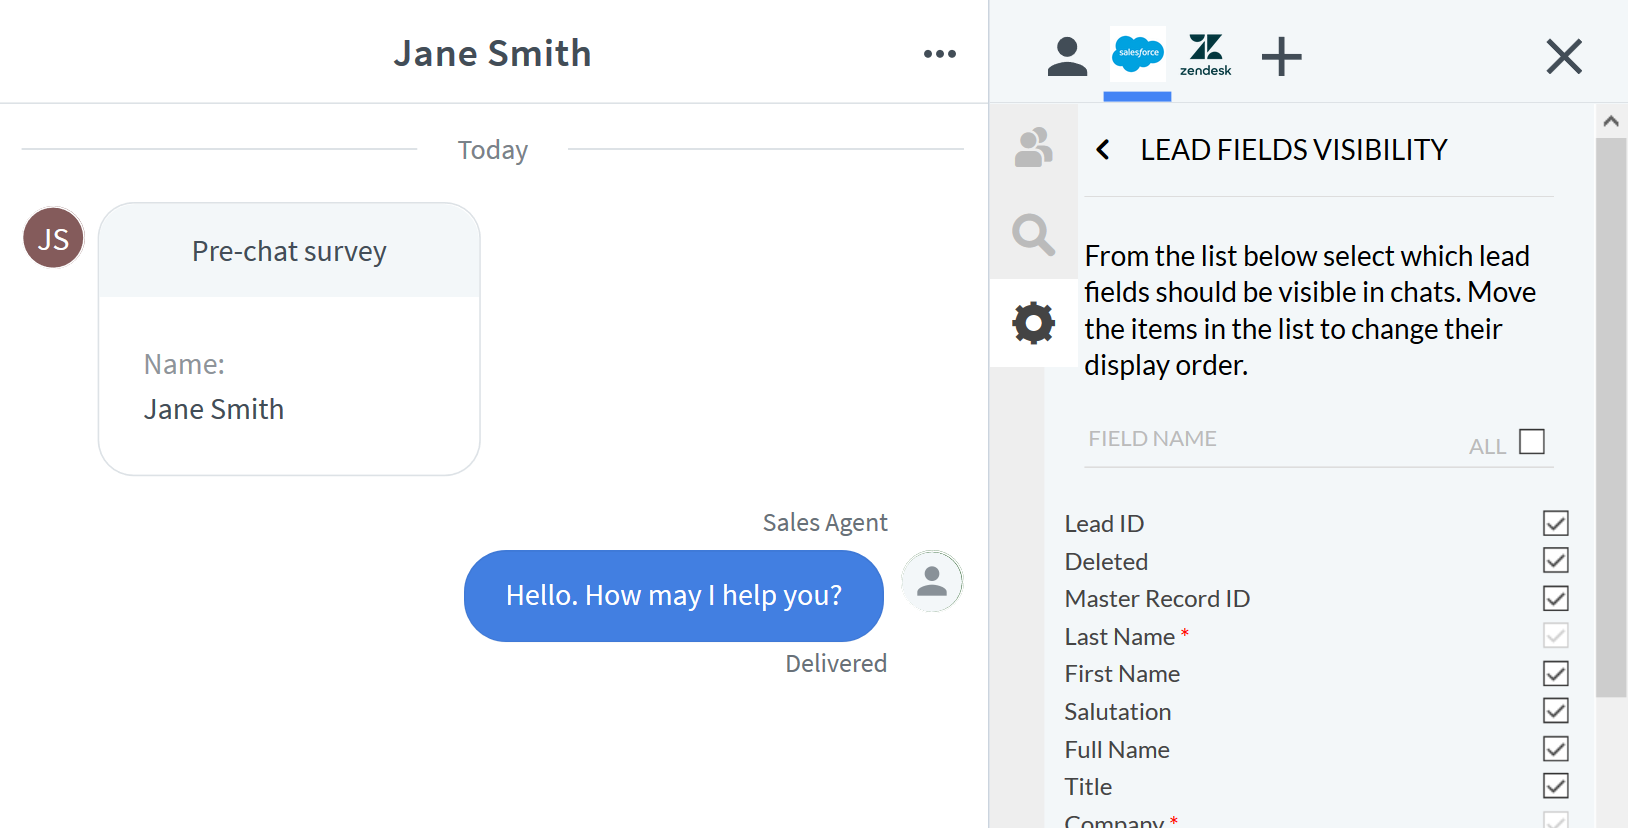
The fields visibility option lets you decide which information about Leads and Contacts will be shown to agents during a chat.
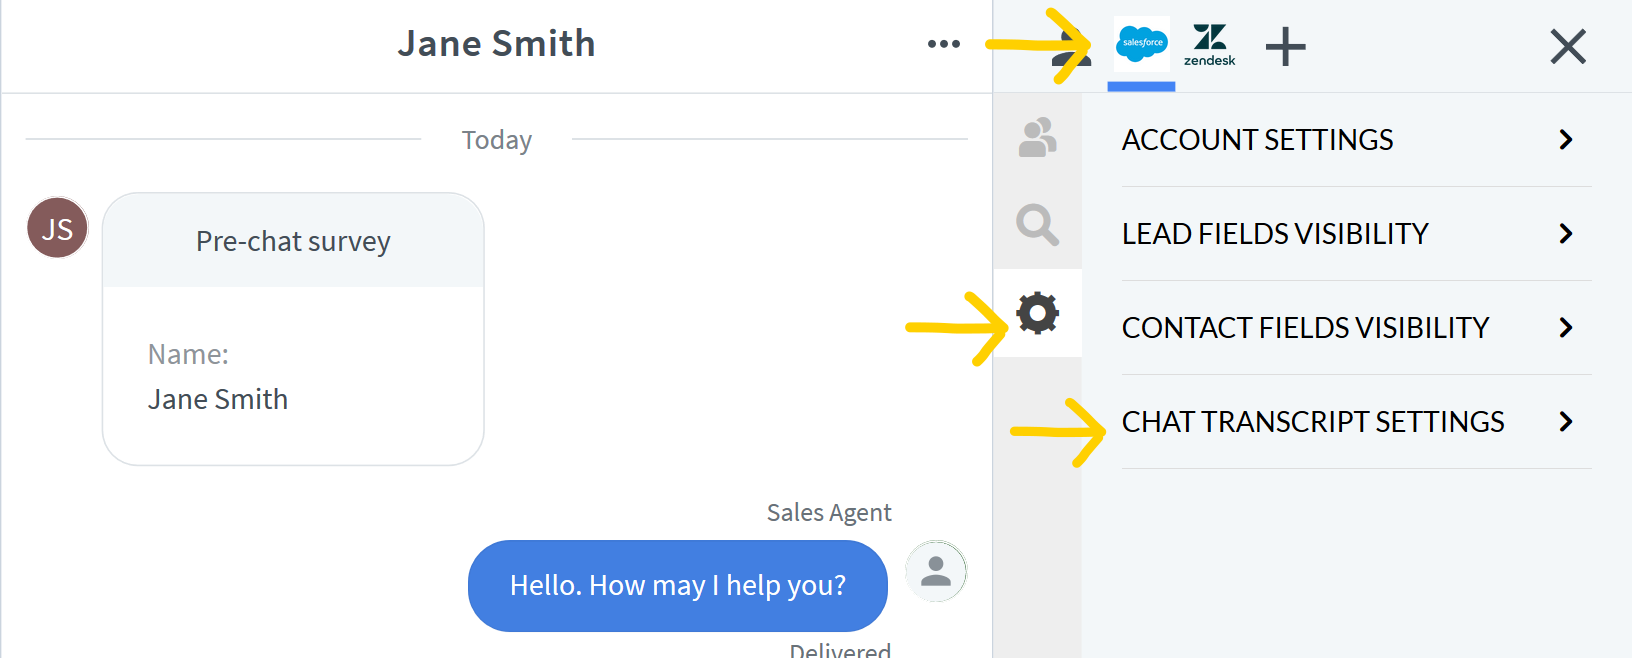
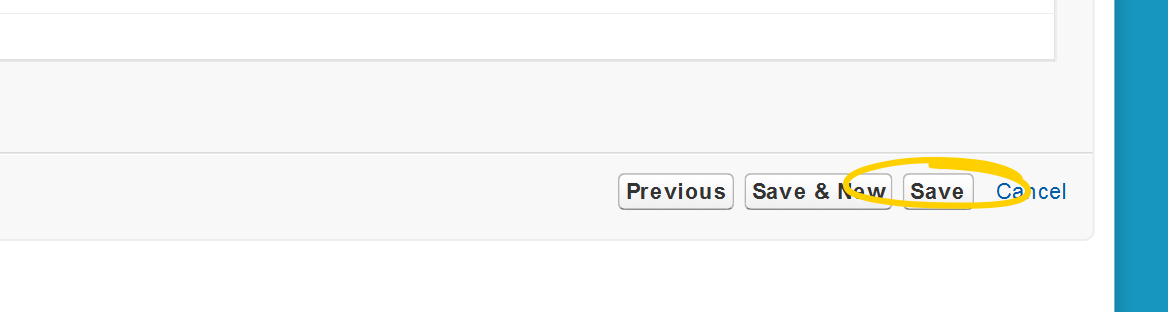
- To configure fields visibility, please click on the Settings button and choose the Lead fields visibility or Contact fields visibility option.

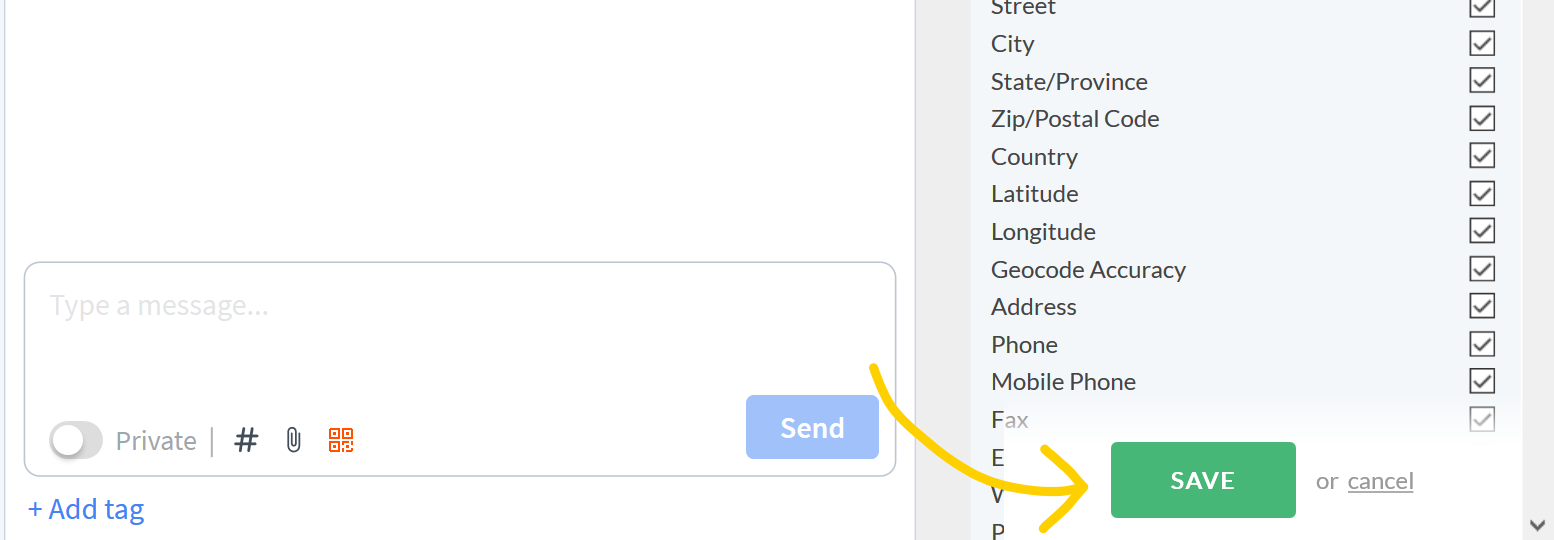
- Now, choose which fields should be visible during a chat in your Salesforce plugin.
- Confirm changes by clicking on Save button.
How to configure Chat transcript settings?
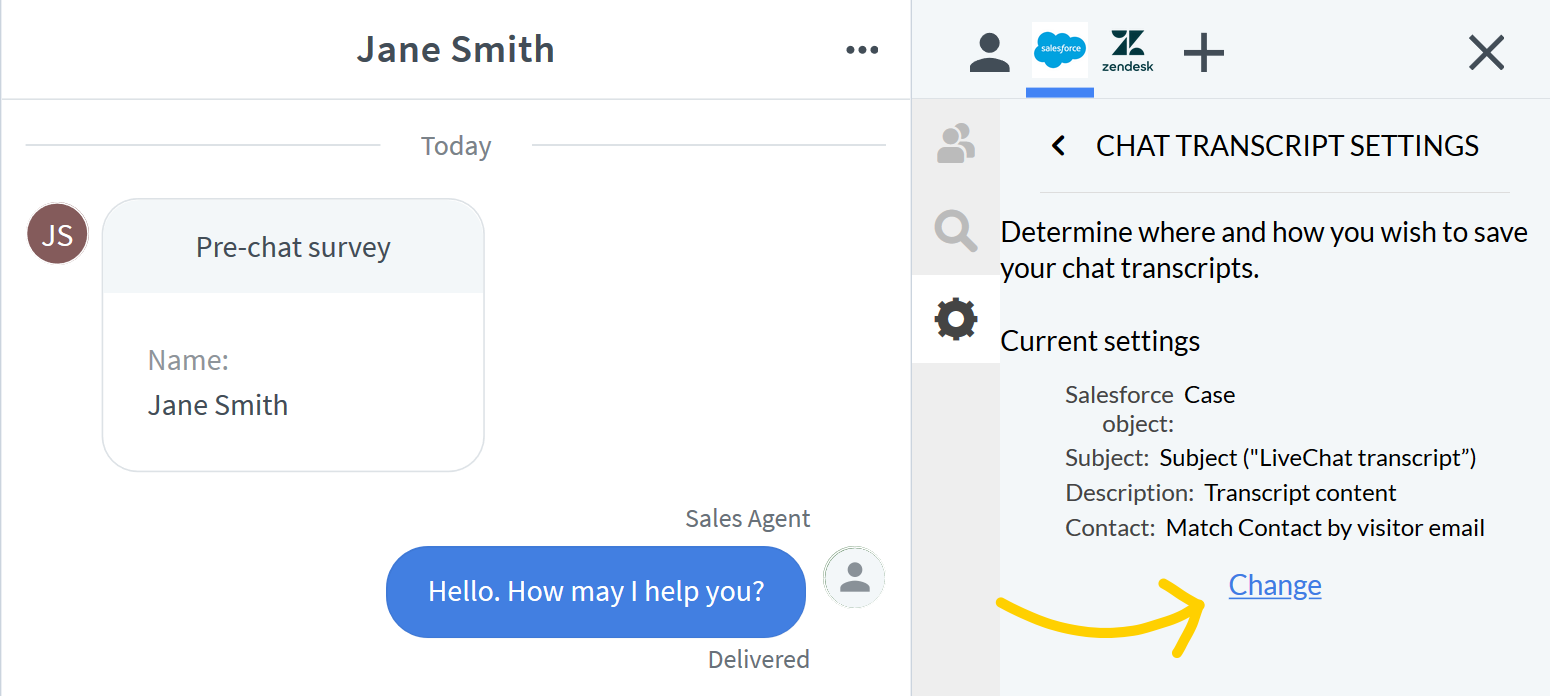
By default, transcripts are being attached as Cases to your Salesforce account, but you can choose any other Salesforce Object and attach transcripts there. For example, as an Object you can use Case or Task.
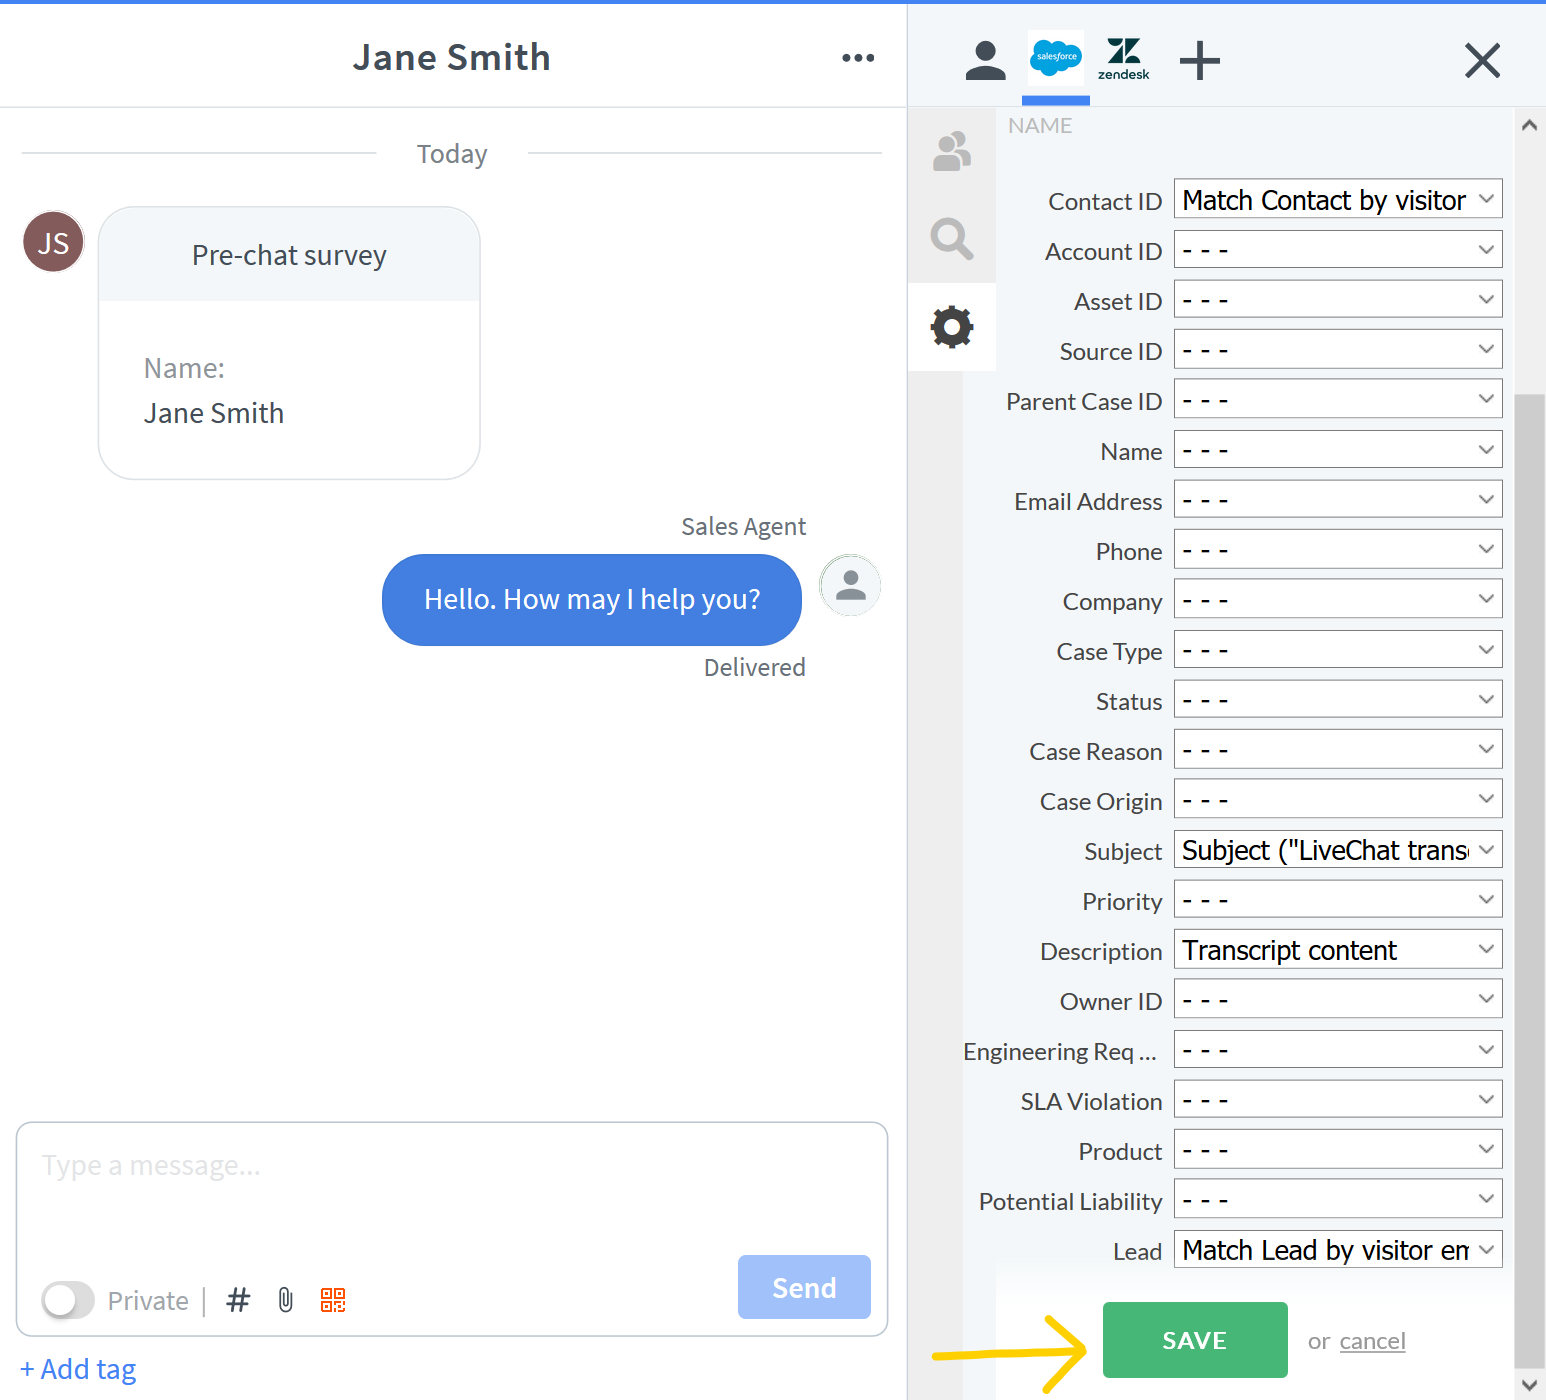
- To do that, open the Salesforce plugin and click on the Chat transcript settings button.
- Click on the Change button and enter the name of the Object to which you would like to pass transcripts.
- Then, select the Transcript fields that you would like to map to each Salesforce field and confirm changes by clicking on Save button.
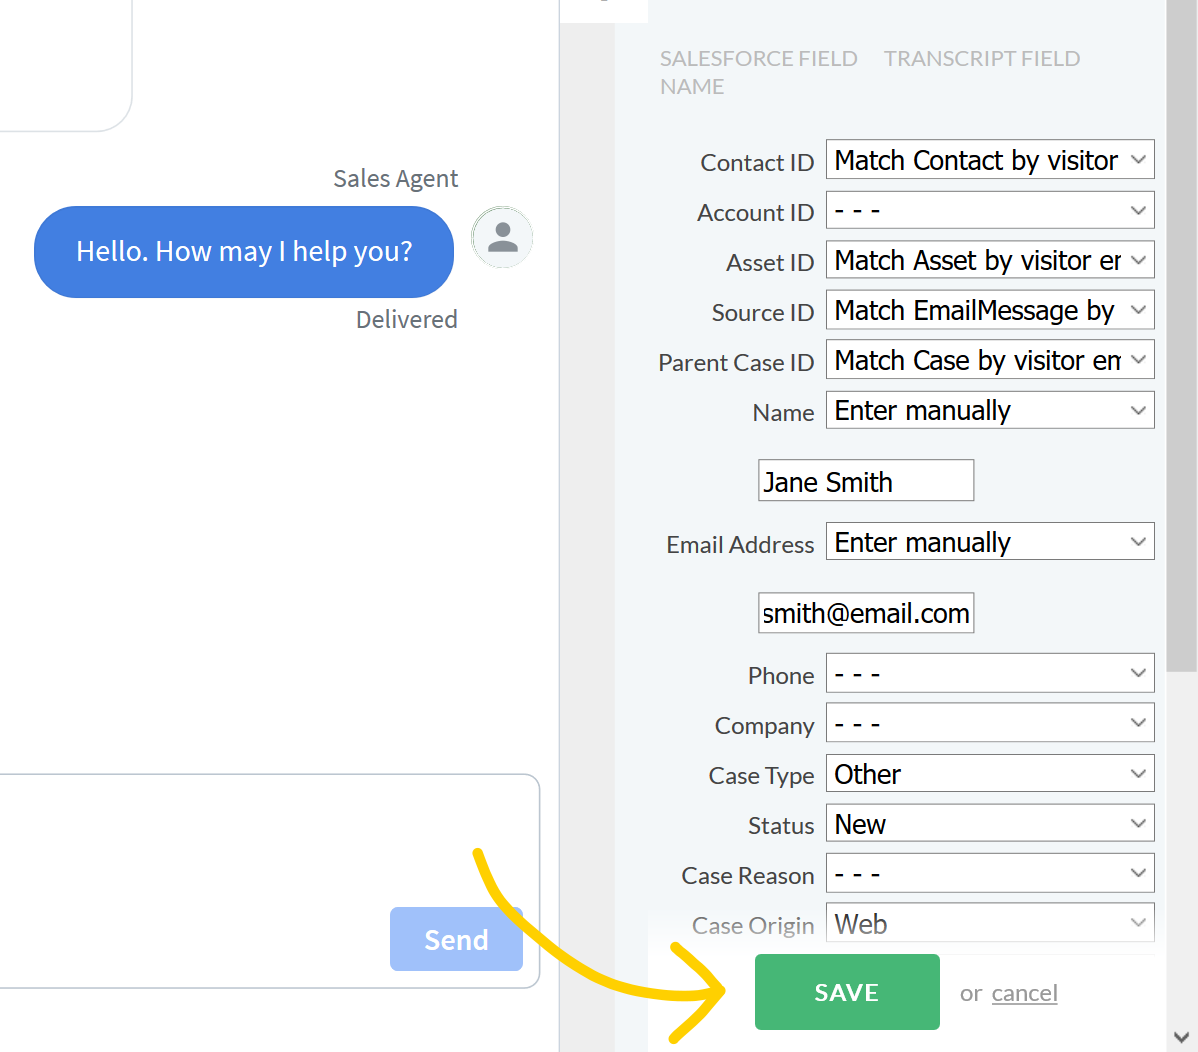
Done! From now, all chat transcripts will be attached to the custom Object in your Salesforce.
How to attach the transcript directly to a Lead or Contact?
Salesforce does have a possibility to attach Lead or Contact to which you are saving Transcripts directly to your Case or Task. By following these steps, you will be able to attach Transcript directly to an existing record in your Salesforce.
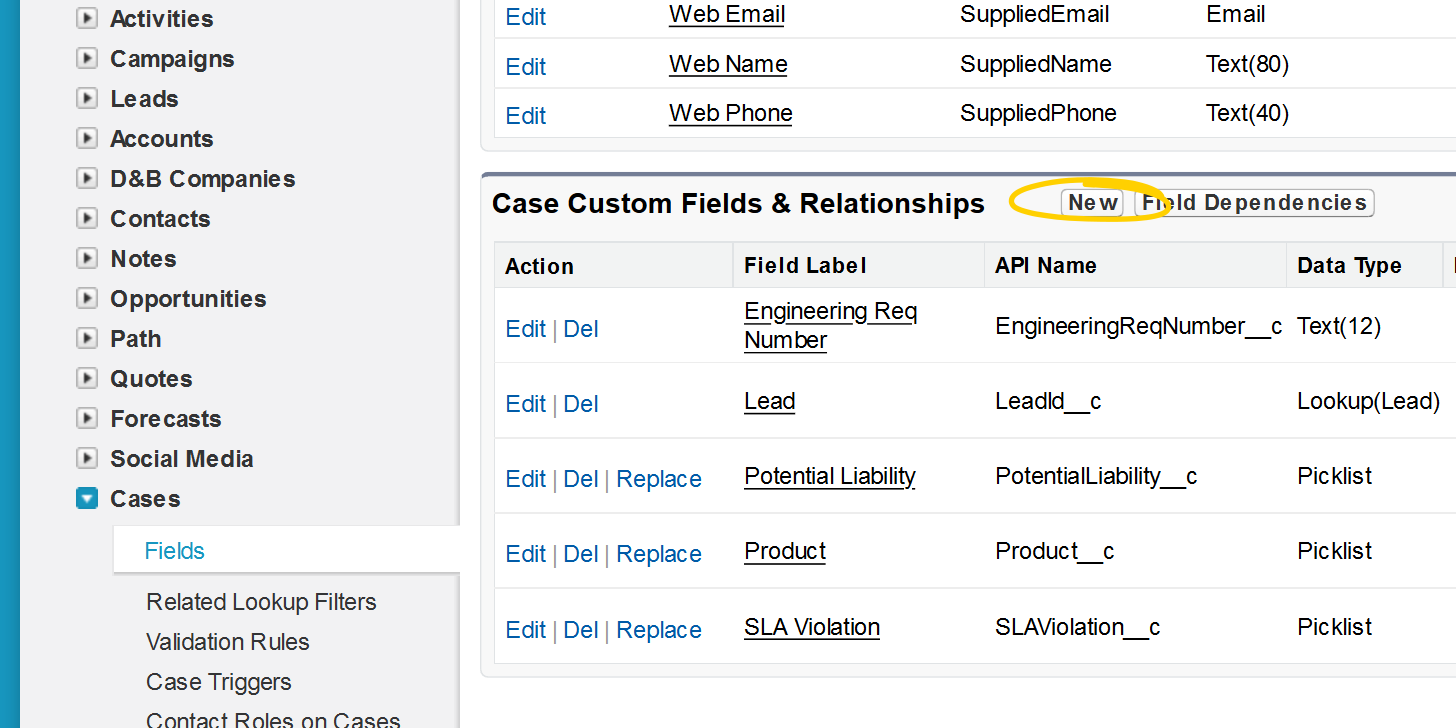
- Go to your Salesforce account and click on Setup in the top right section of your Salesforce dashboard - note that you will need the Administrator’s privileges to customize those options.

- Type Cases in the Search tool and click on Fields button.
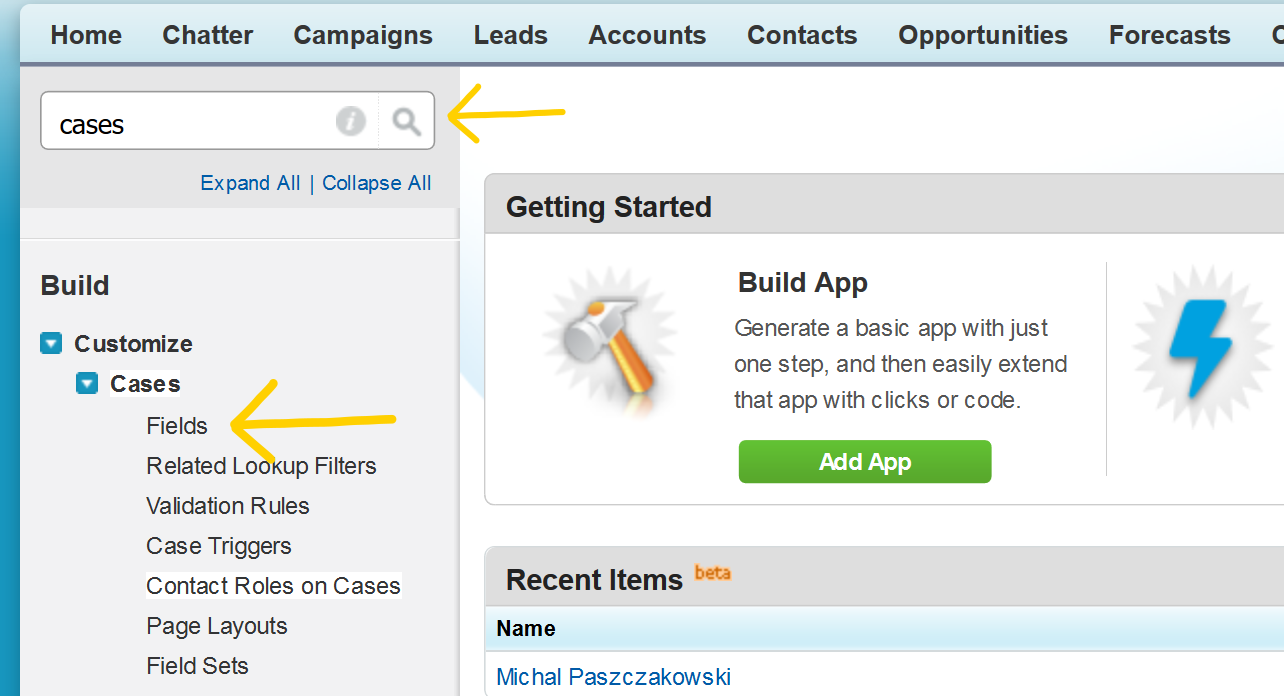
- Scroll down to the Case Custom Fields & Relationships section and click on the New button.
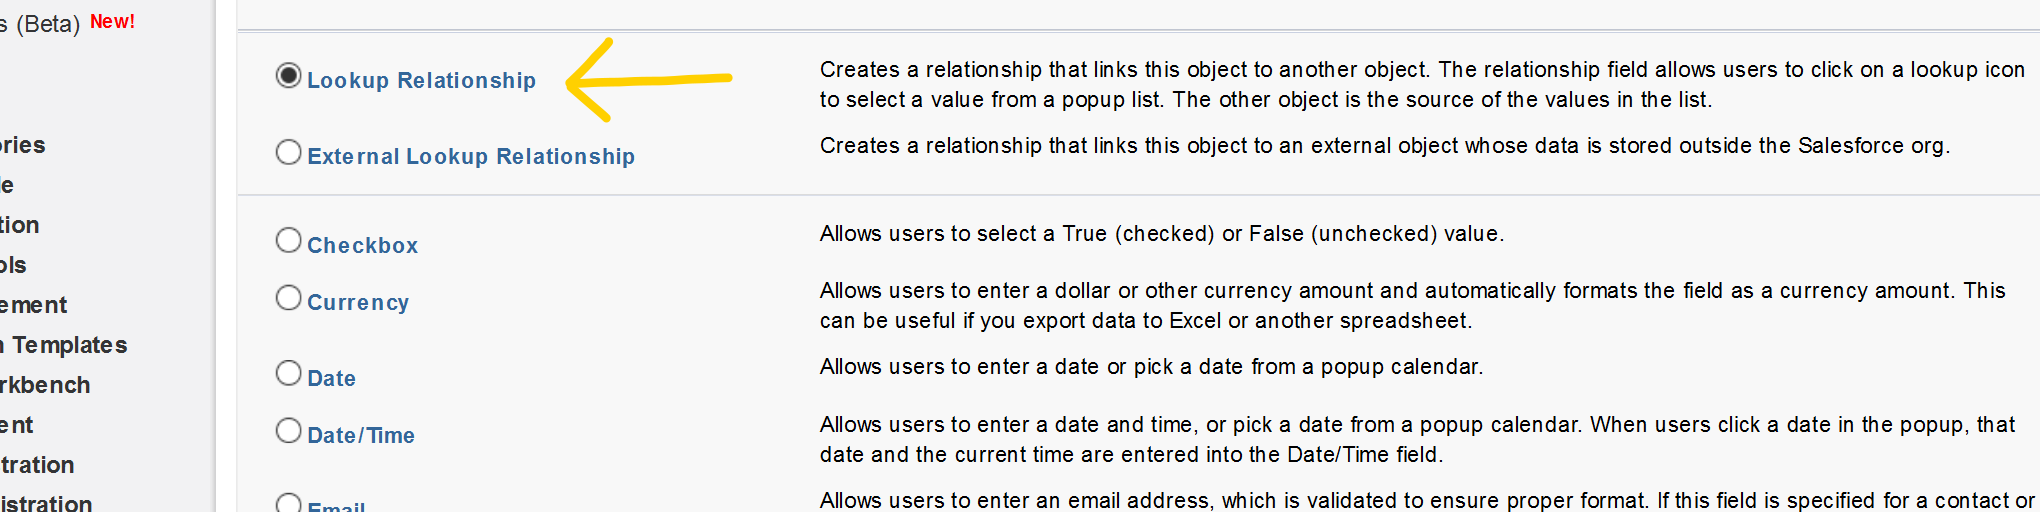
- Select Lookup Relationships option from the list and click Next.
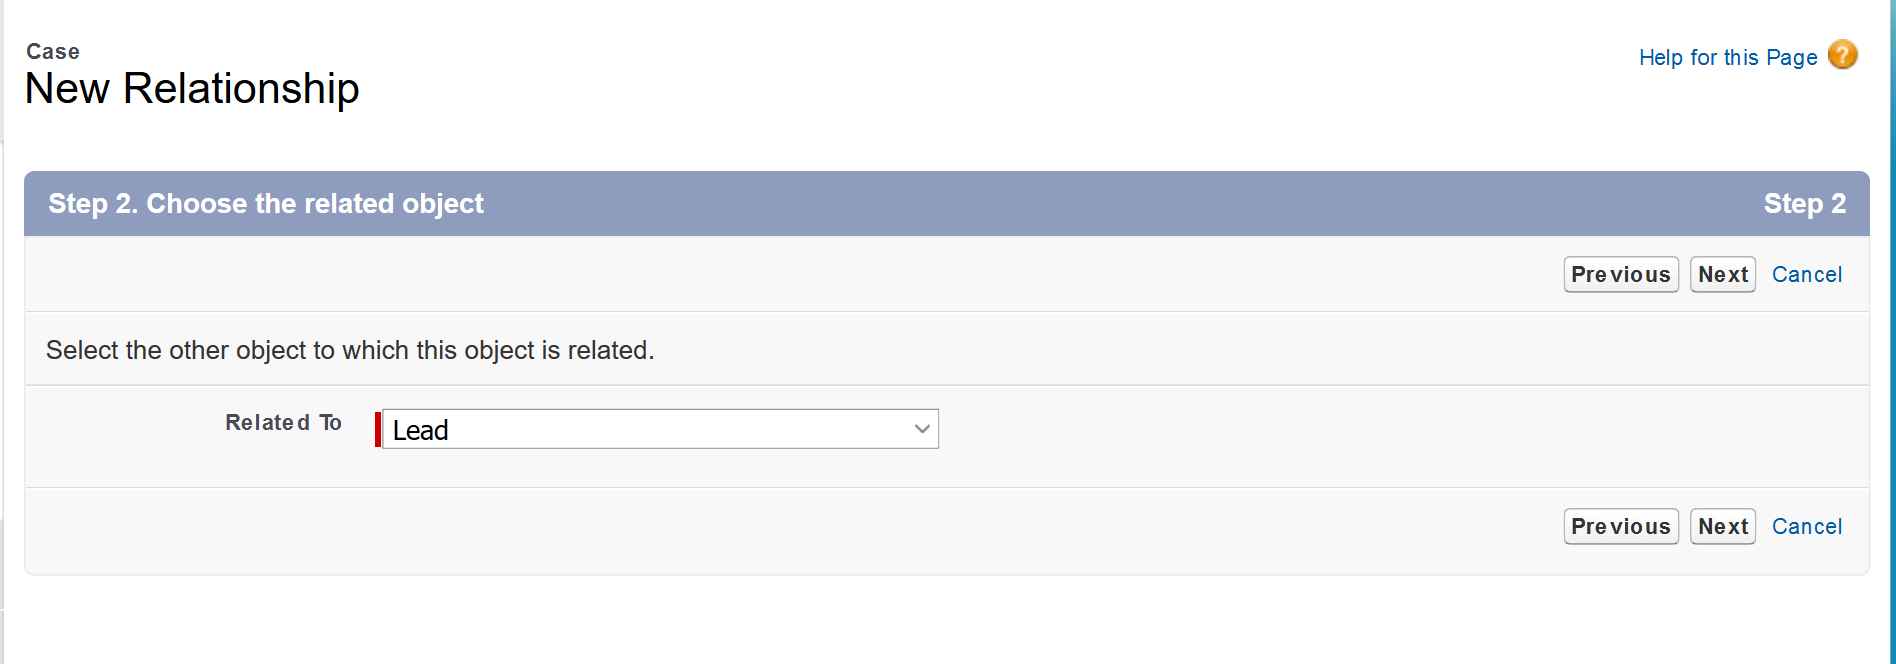
- If you would like to connect a transcript to a Lead, select Lead in the Related To dropdown menu. Confirm the action by clicking on Next.
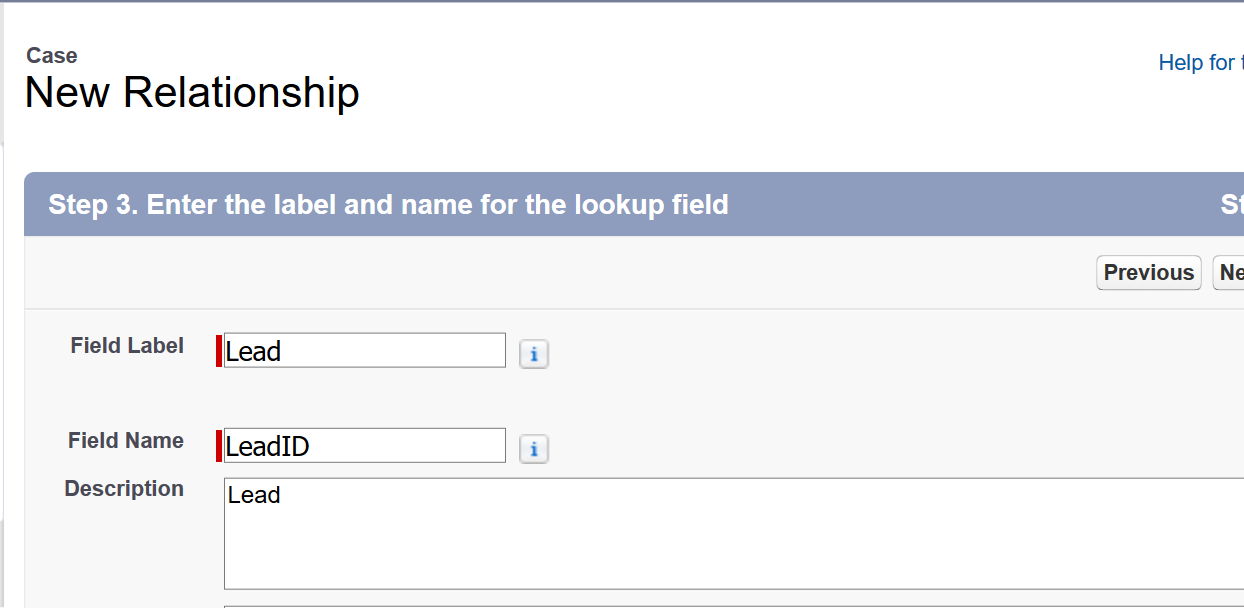
- In the next section, type LeadId in the Field Name section and Lead in the Description field. After that, click on Next.
- Click through the Step 4 and 5 by clicking on the Next button.
- Finally, apply changes by clicking on the Save button.
- All you need to do now is go to the Chat transcript settings in your LiveChat Salesforce Plugin and use the following settings:
- After entering the correct settings, confirm by clicking on Save button.
Done! Now, when attaching a chat transcript to a Lead, it will be automatically related to it.
Why I cannot add new Leads or Contacts?
If you are using a custom security settings for your Salesforce, it’s possible that LiveChat integration may not work properly. For example, you will not be able to add new Leads or new Contacts to your Salesforce account. In order to workaround this issue, you may set up a custom permission set for agents using your LiveChat and Salesforce account.
As the process may be tricky, we have prepared a short training video, guiding you through the entire process of creating the custom Permission Set. We hope that you will enjoy it!
How to disconnect your Salesforce account from LiveChat?
If you are no longer using Salesforce or if you would like to simply stop using the integration, you can disconnect it directly in LiveChat plugin.
- To do that, open the Salesforce plugin and click on the Account settings.

- To disable the integration, click on the Disconnect button and confirm.

Done! Now you know what you can achieve with the proper Salesforce configuration.
How to use the integration to your advantage?
This section will tell you how to:
- Create Leads and Contacts from chats, chat archives and the Traffic section of your LiveChat
- Search Salesforce Leads and Contacts directly from LiveChat
- Update Lead and Contact information directly within LiveChat
- Pass chat transcripts either as Cases or any other Object that you have created in your Salesforce account
How to add Leads and Contacts to Salesforce?
Adding new Leads or Contacts is simple and the process looks the same for both. All you have to do is follow these steps.
- Choose a chat from which you would like to add a new Lead or a Contact.

- Or choose a chat transcript from the Archives section of your LiveChat.

- You can also choose a visitor directly from the Traffic section of your LiveChat.

- Next, click on the Salesforce button in the top right corner of your LiveChat dashboard and click on Add New Lead or Add New Contact button.
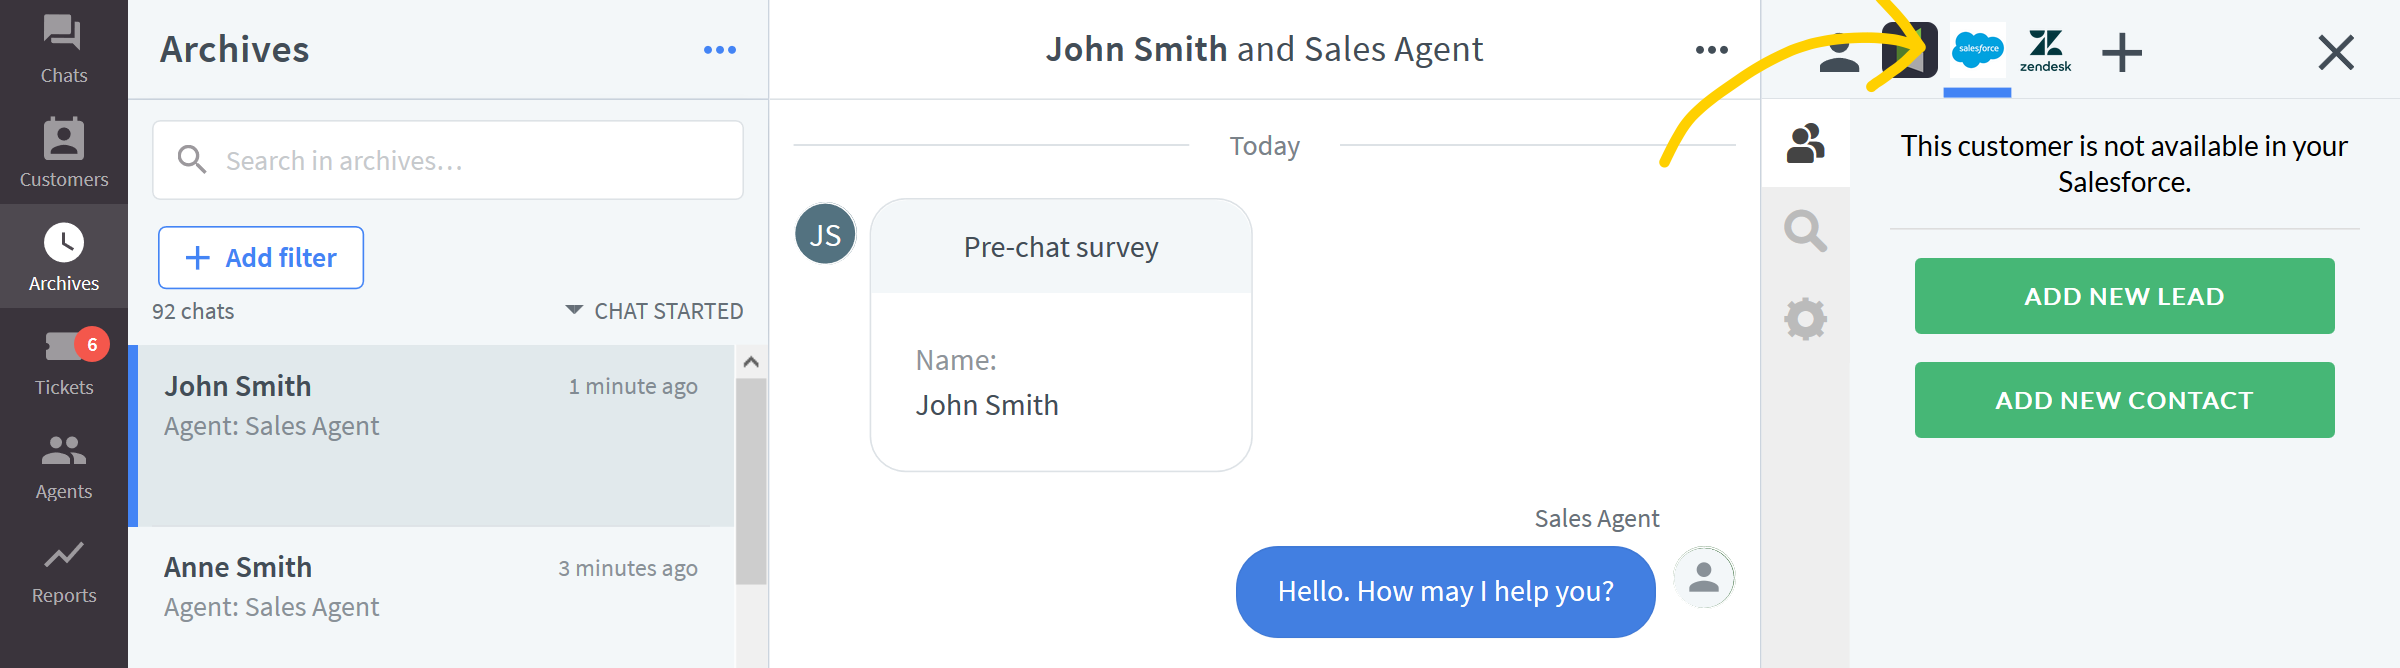
- You will see a form where you can fill out the customer’s data to pass to Salesforce.
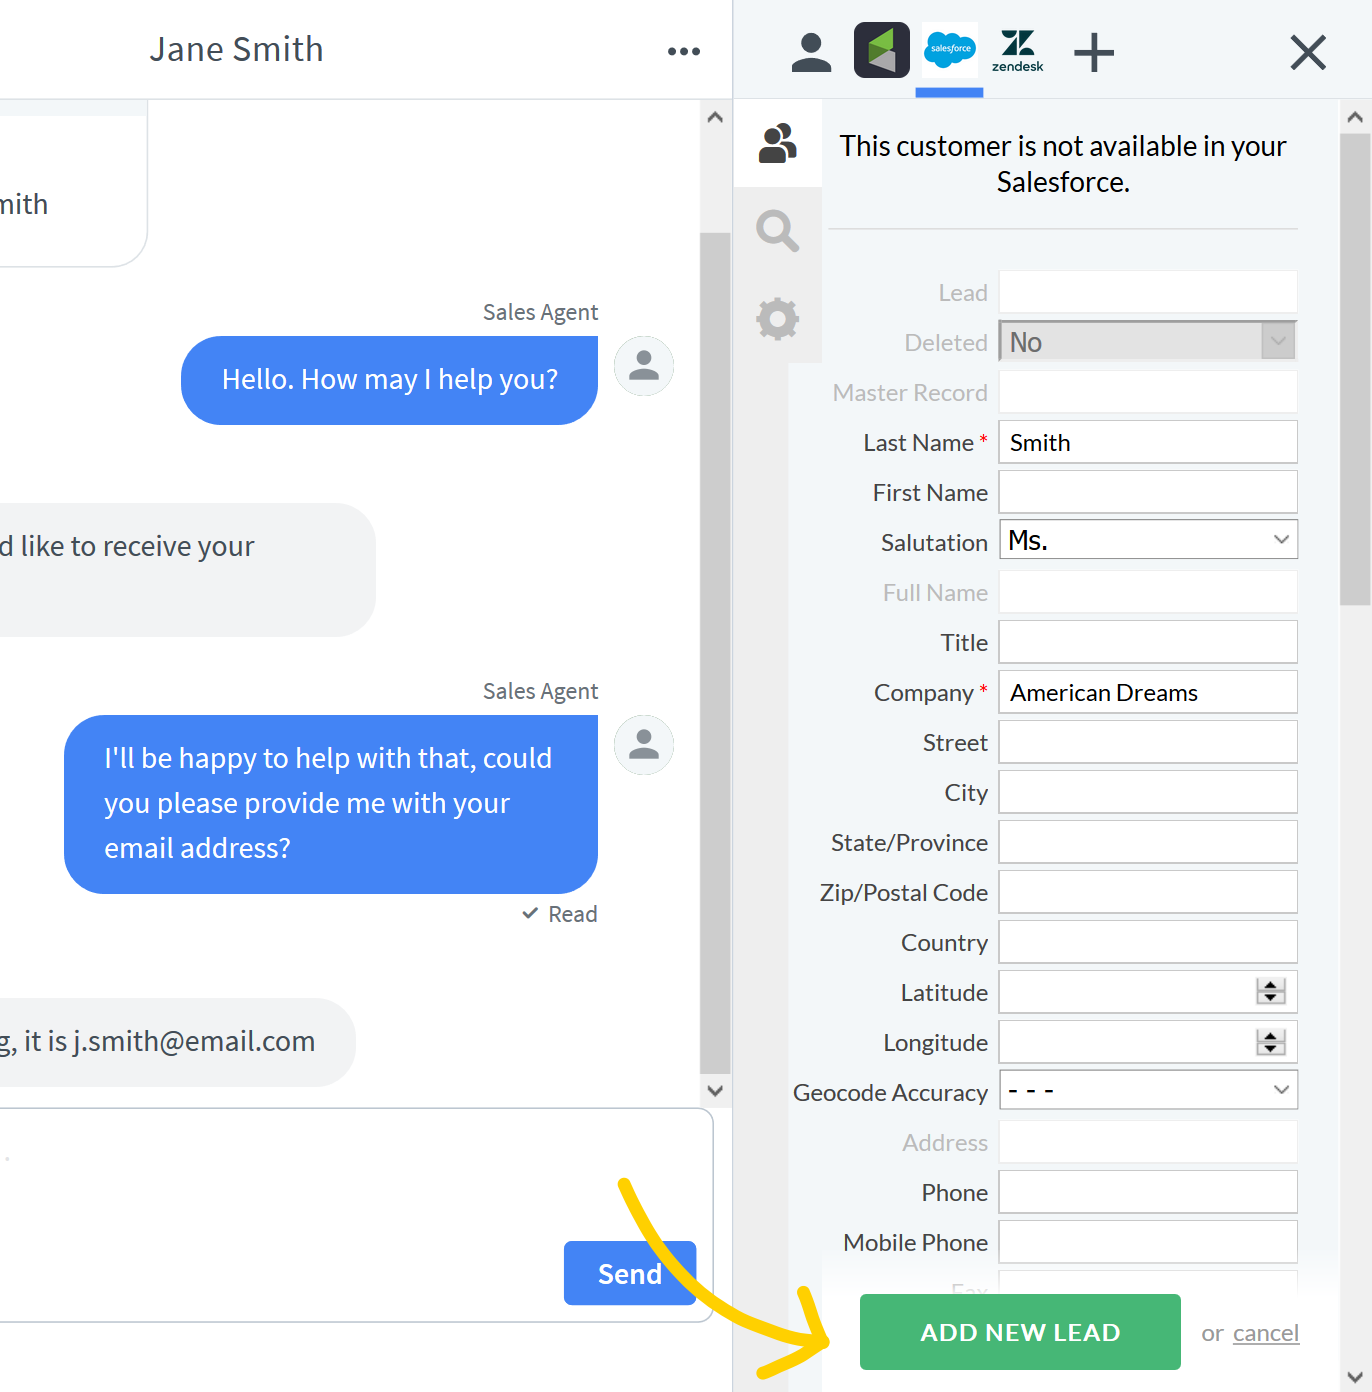
- Confirm adding a Lead or a Contact by clicking on the green button at the bottom of the form.
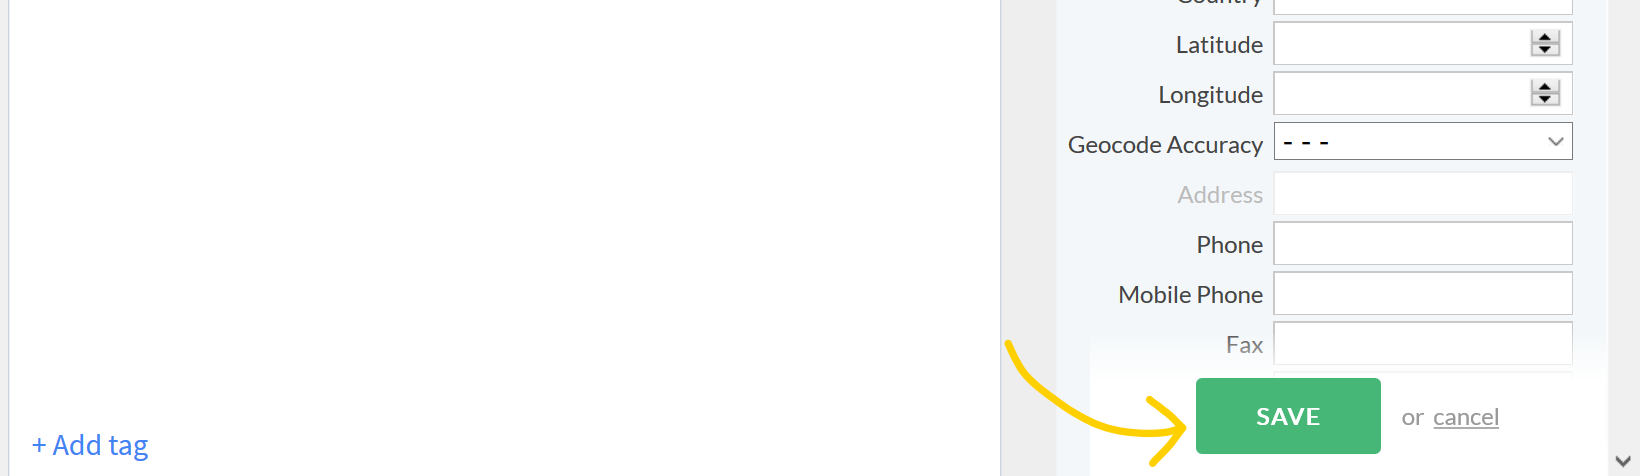
How to edit existing Leads and Contacts?
Follow the steps below to edit the existing Leads and Contacts directly within your LiveChat dashboard.
- To do that, choose an existing Lead or Contact and click on the Edit details button.
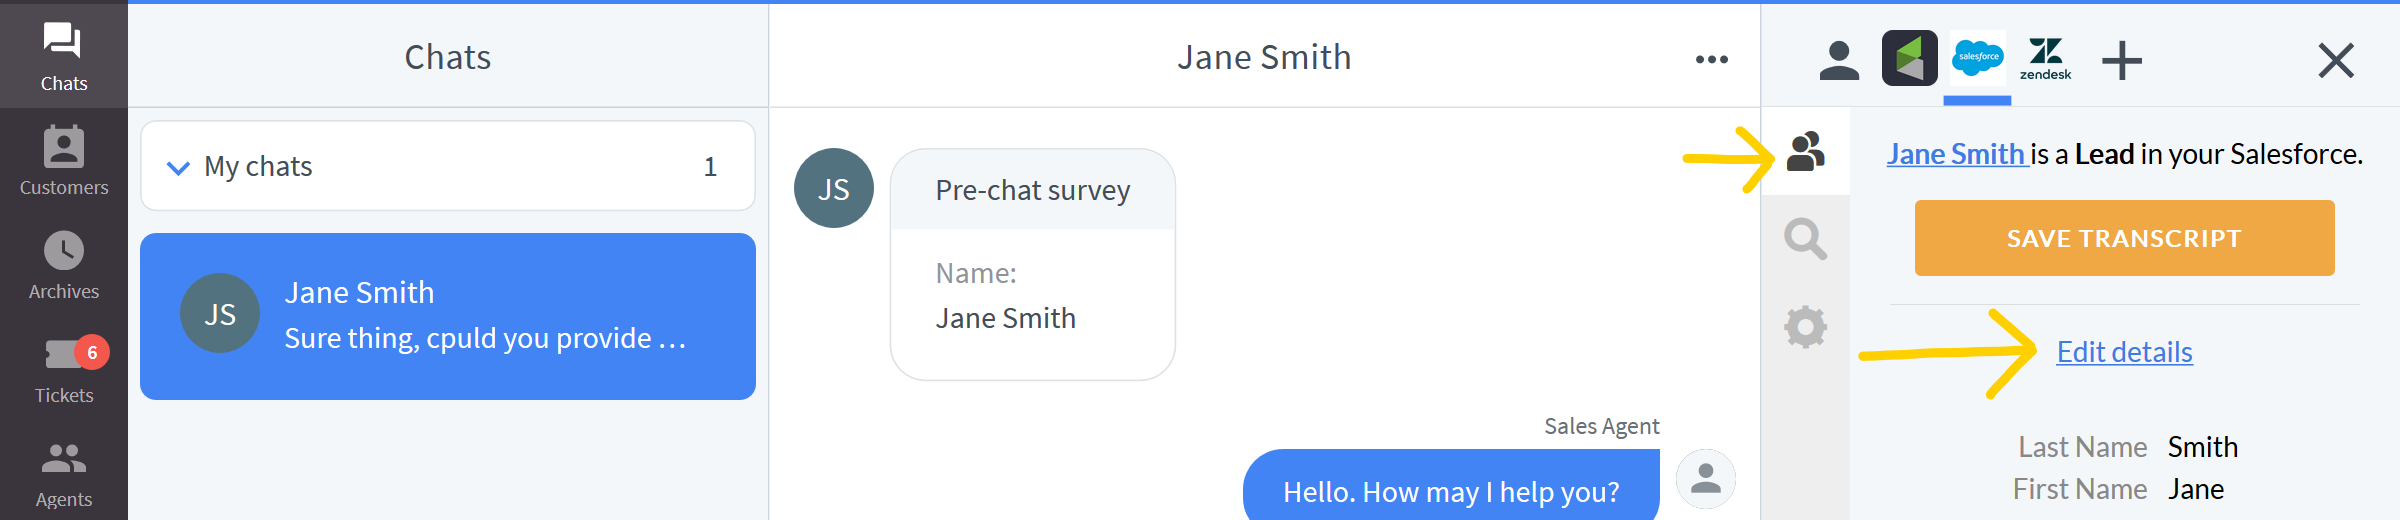
- Update information in the table and confirm changes by clicking on the Save button.
How to search existing Leads or Contacts?
Using the Salesforce plugin, you can search for existing records in your Salesforce account - Leads and Contacts.
- To do that, click on the Salesforce button and hit the Magnifier icon. Then, provide the email address that you are looking for.
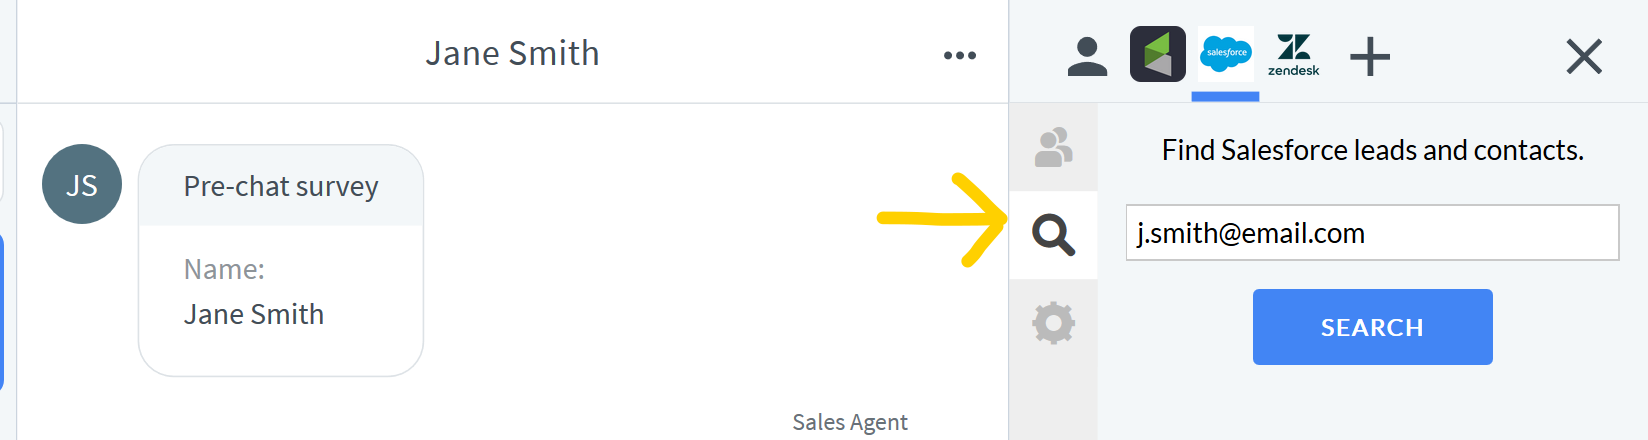
If the Lead or Contact already exists in your database, detailed information will be loaded in the panel.
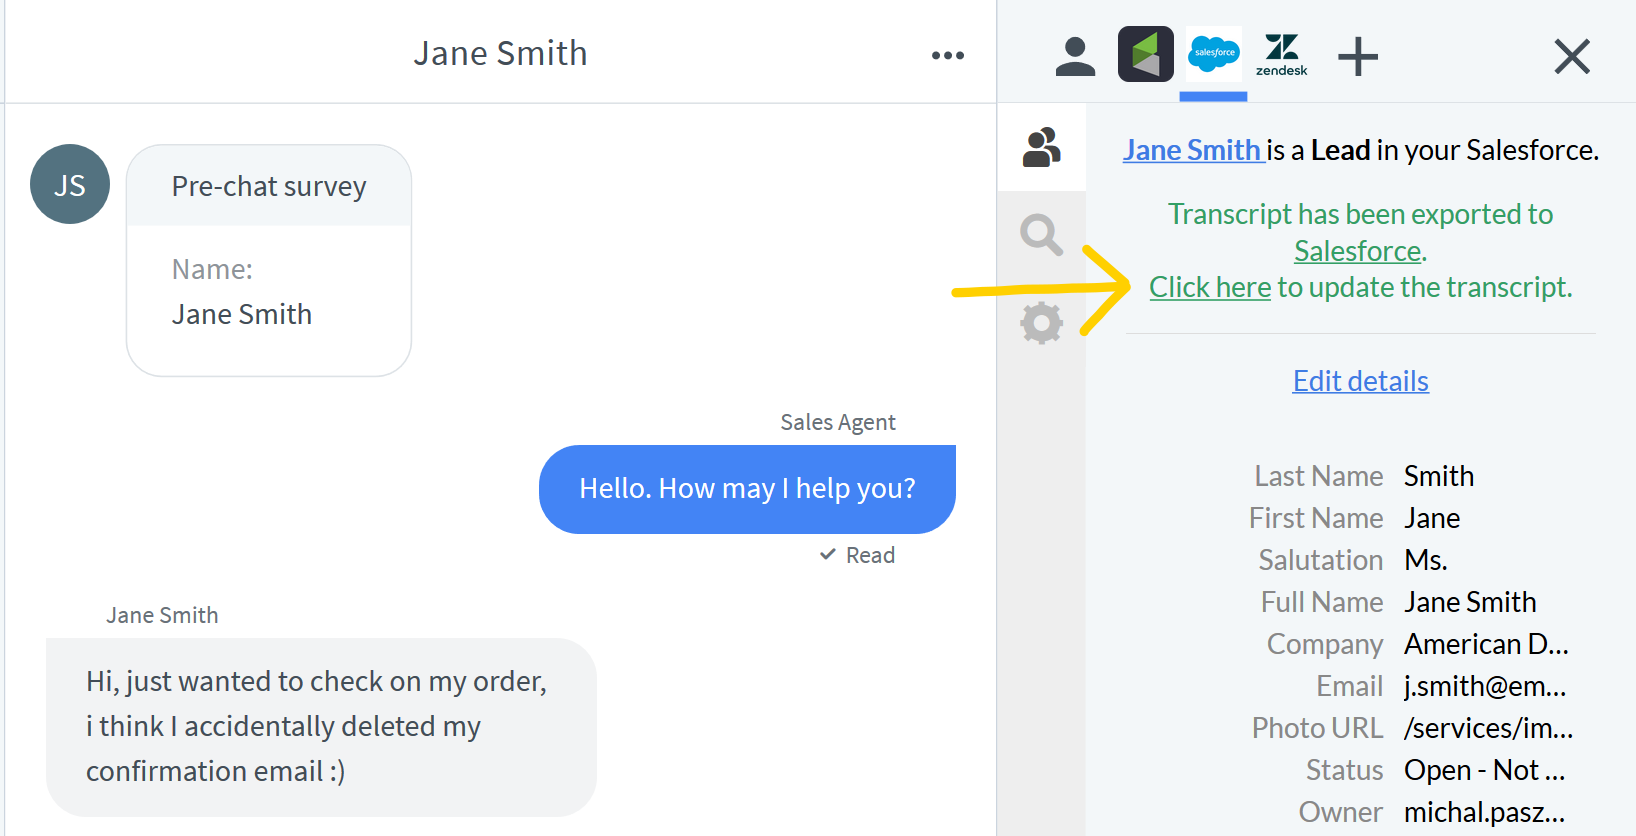
How to Save a Chat Transcript to Salesforce
Saving transcript is even easier then adding the Salesforce integration itself. Transcripts can be added directly from Chats or from your Archives.
- To do that, click on a Chat or select a Transcript from the Archives section of the app and click on the Save transcript button.
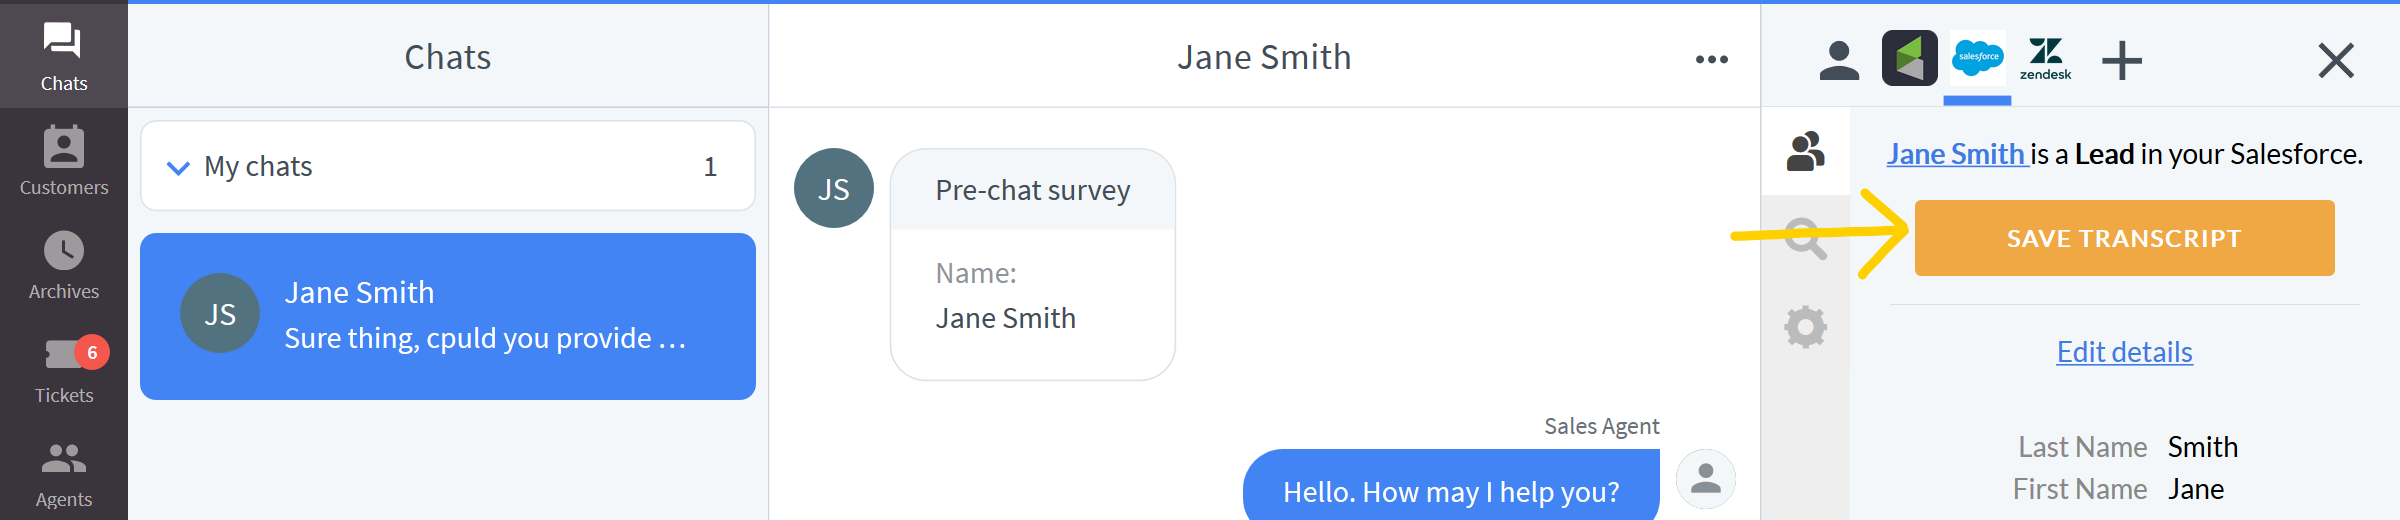
The transcript will be forwarded to your Salesforce immediately, right after clicking on the Save transcript button. If your chat is not yet finished and you have saved the incompleted transcript, fear not!
To update your transcript in Salesforce so that it will include the latest messages sent by you and/or your visitor, simply click on the Click here, available after sending the transcript to Salesforce.
Done! Now you know what possibilities does the Salesforce integration has to offer! Hopefully you have found this article helpful but if you have any additional questions, feel free to start a chat with us - we are available 24/7/365!
Resolving Permission Issues
In most cases, the initial configuration of the Salesforce integration should be seamless and uninterrupted. However, if you experience issues, they’re likely due to the lack of the Approve Uninstalled Connected Apps permission. Below, you will find detailed instructions on how to fix this.
-
Sign in to Salesforce and open Setup.
-
In Quick Find, search for and open Profiles.
-
Open the profile assigned to your user and confirm these Administrative Permissions are enabled:
- Approve Uninstalled Connected Apps
- API Enabled
-
Make sure that both permissions are enabled.
-
Click Save, perform a hard refresh of your LiveChat app window, and try connecting again.

Need help? If you run into any problems, start a chat with us using the widget in the bottom-right corner - we’re available 24/7/365.